Connect a provider without an API key
Connect Anthropic or OpenAI to the LLM gateway with a workload identity connection, so Mintive (formerly MintMCP) calls the provider without an API key. You set up your provider account to trust Mintive's identity, then copy a few IDs back into Mintive.
Workload identity connections are in early access. Contact us to turn them on for your organization.
How workload identity connections work
When the gateway needs to call the provider, Mintive signs a short-lived identity token and exchanges it at the provider for a temporary access token, using the provider's workload identity federation. Mintive stores no provider key, so there is no key to rotate or leak, and you stay in control at the provider:
- You choose what Mintive can do. The rule (Anthropic) or mapping (OpenAI) you create sets the scope or permissions of every token Mintive gets, limited to one workspace or project.
- Tokens are short-lived. An Anthropic token lasts at most 10 minutes, and an OpenAI token stops working within about a minute of you deleting the mapping.
- You can switch Mintive off at the provider at any time, without changing anything in Mintive. See Switch Mintive off for Anthropic and for OpenAI.
- Each request still runs through your gateway policies, so budgets, model restrictions and monitoring apply as they do for API key connections.
Before you start
- In Mintive, you need the admin role. If it was just given to you, choose Refresh session from the user menu, or the gateway's admin controls don't appear.
- At the provider, you need an admin role in your organization.
The examples below use Mintive's US region (issuer https://issuer.mintive.com/us), so the suggested names end in -us. In the EU region, end them with -eu instead and use the EU values Mintive shows you.
Start in Mintive
- Go to LLM gateway, then Providers, and choose Add provider.
- Set Provider to Anthropic or OpenAI.
- Leave Authentication set to Workload identity (recommended).
If there is no Authentication field, workload identity connections aren't turned on for your organization yet. Contact us to turn them on.
Keep this screen open while you work at the provider, because it shows the same steps as this guide, one at a time, each with the values to enter and a copy button beside them. Choose Done, next step to move on. Values you type stay in place when a step folds, but closing the screen discards them.
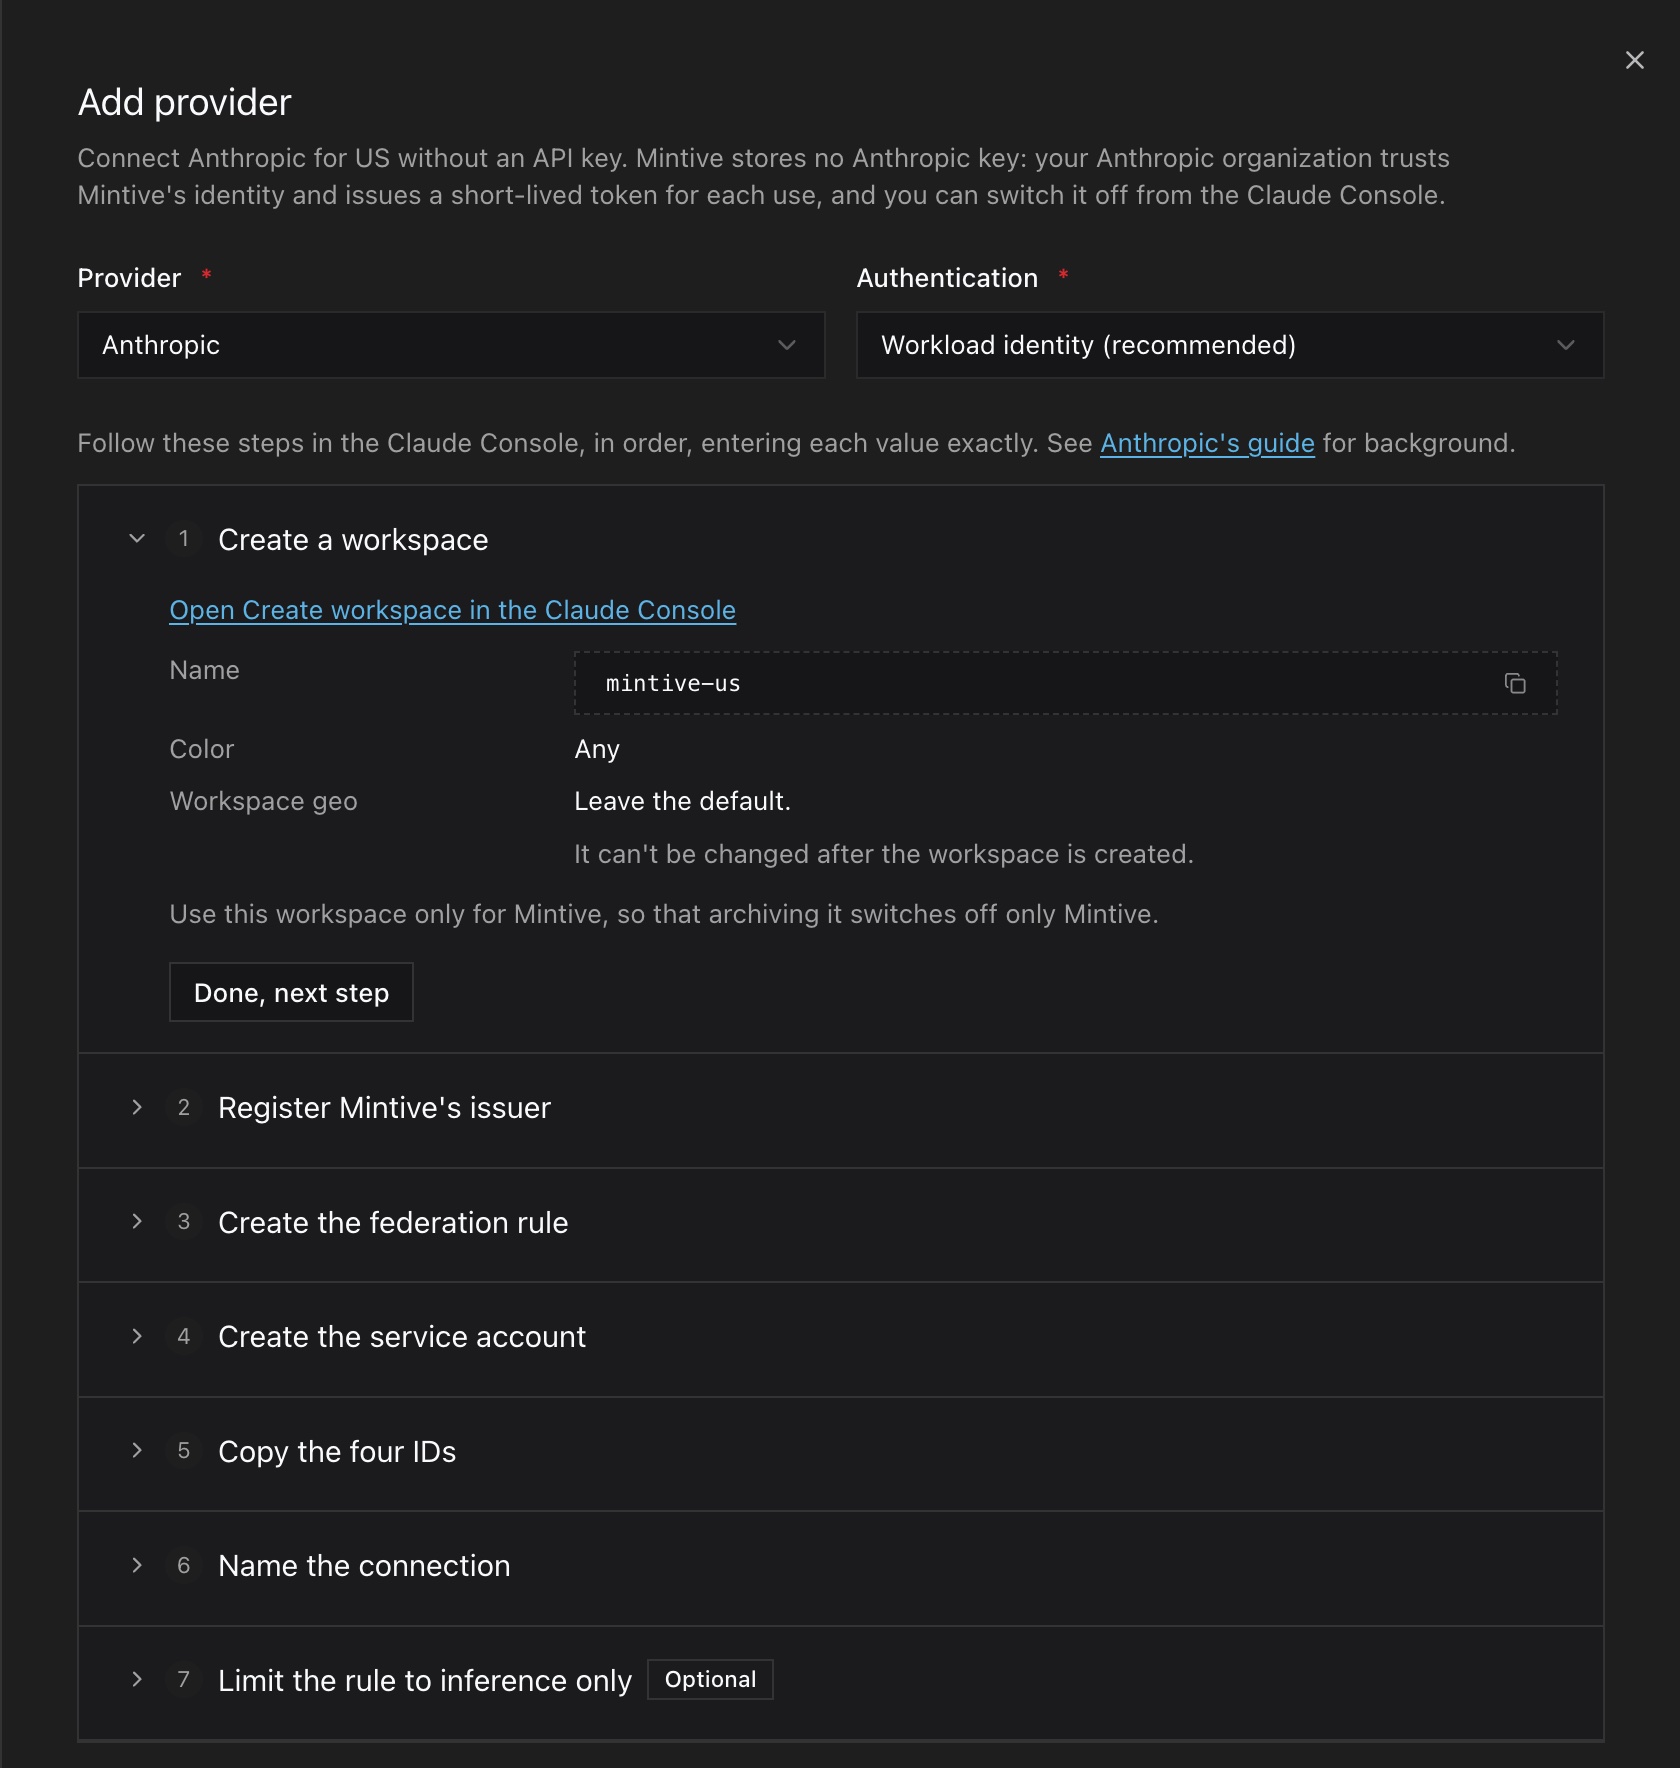
Mintive shows you these values to enter at the provider:
| Value | Where it goes | What it looks like |
|---|---|---|
| Issuer URL | The provider's issuer or identity provider | https://issuer.mintive.com/us |
| Subject | The provider's rule or mapping | organization:org_…:llm-gateway, with your Mintive organization's ID. Copy it from the screen. |
| Audience | Anthropic fills it in; OpenAI asks for it | https://api.anthropic.com or https://api.openai.com |
Mintive stores the IDs you paste back, not the names, so the names you give items at the provider are labels only. The suggested names keep Mintive's items easy to find and separate from anything set up for API keys:
| Name | Used for |
|---|---|
mintive-us | The workspace (Anthropic) or project (OpenAI), and the issuer (Anthropic) or identity provider (OpenAI) |
mintive-workload-identity-us | The federation rule (Anthropic) or mapping (OpenAI), and the service account |
Then follow the steps for your provider: Anthropic or OpenAI.
Anthropic
You create one workspace, then run the Claude Console's Connect workload wizard, which creates an issuer, a federation rule and a service account. At the end you copy four IDs back into Mintive.
1. Create a workspace for Mintive
In the Claude Console, go to Settings, then Workspaces, and choose Create workspace.
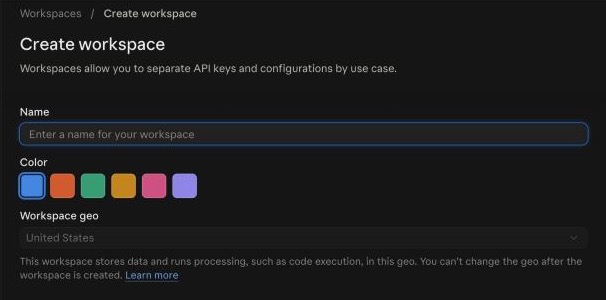
| Field | Enter |
|---|---|
| Name | mintive-us |
| Color | Any |
| Workspace geo | Leave the default. It can't be changed after the workspace is created. |
Use this workspace only for Mintive. Archiving a workspace cuts off tokens Mintive already holds at once, and it affects everything in the workspace, so it's only a safe off switch if nothing else lives there.
To cap spend at the provider, open the workspace from Settings, then Workspaces, choose Spend limits, pick mintive-us under Workspace limits, and choose Adjust limit. Your organization's limit still applies on top. If a provider limit is reached before your Mintive policy budget, requests fail with the provider's error instead of Mintive's budget message.
2. Connect workload: Issuer
Go to Settings, then Workload identity, and choose Connect workload. On the first step, choose New provider, then Custom OIDC. If your organization has already registered Mintive's issuer, choose Registered issuer and pick it instead.
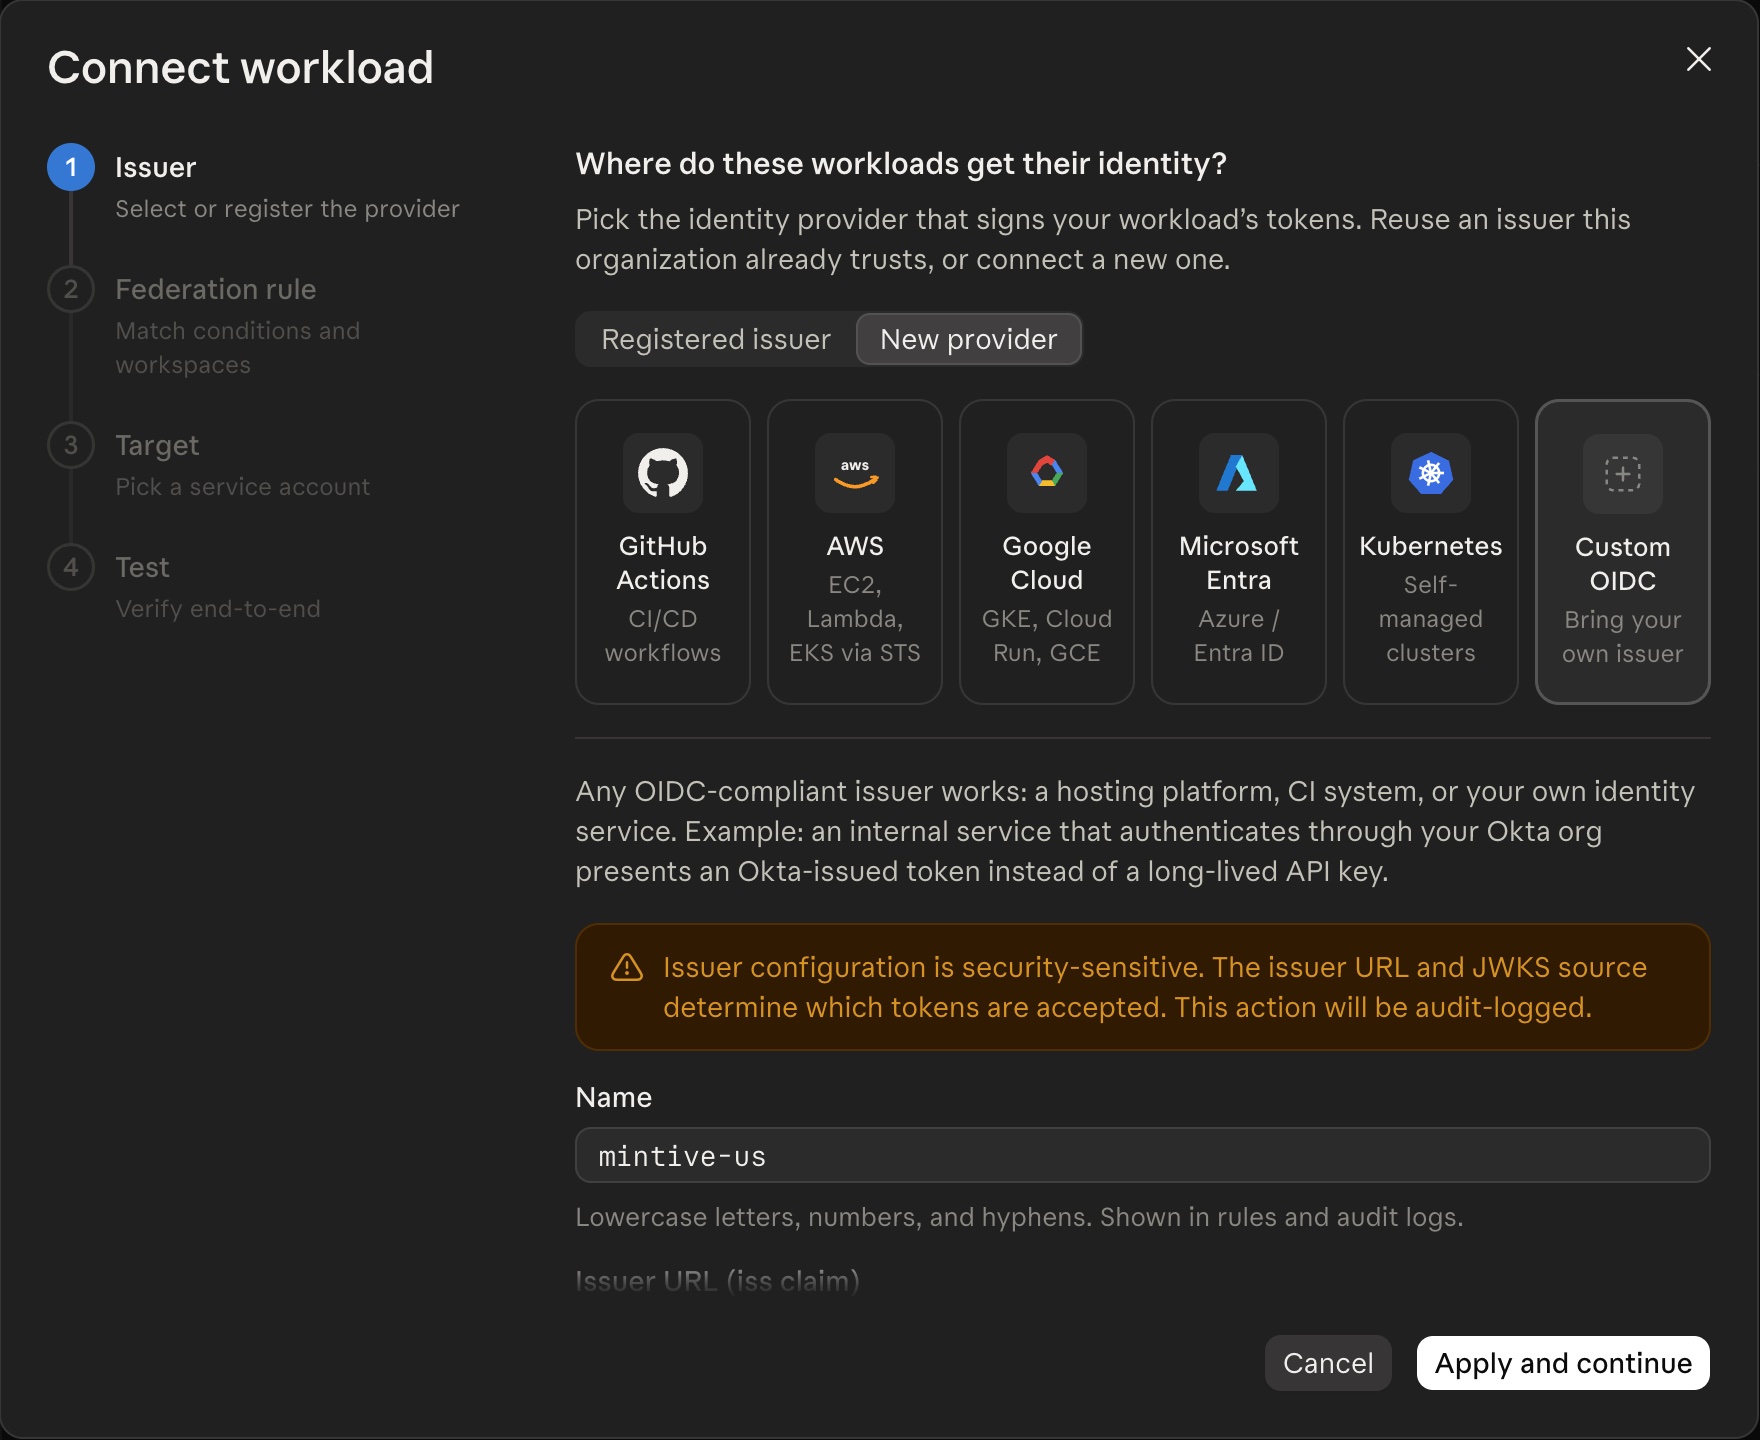
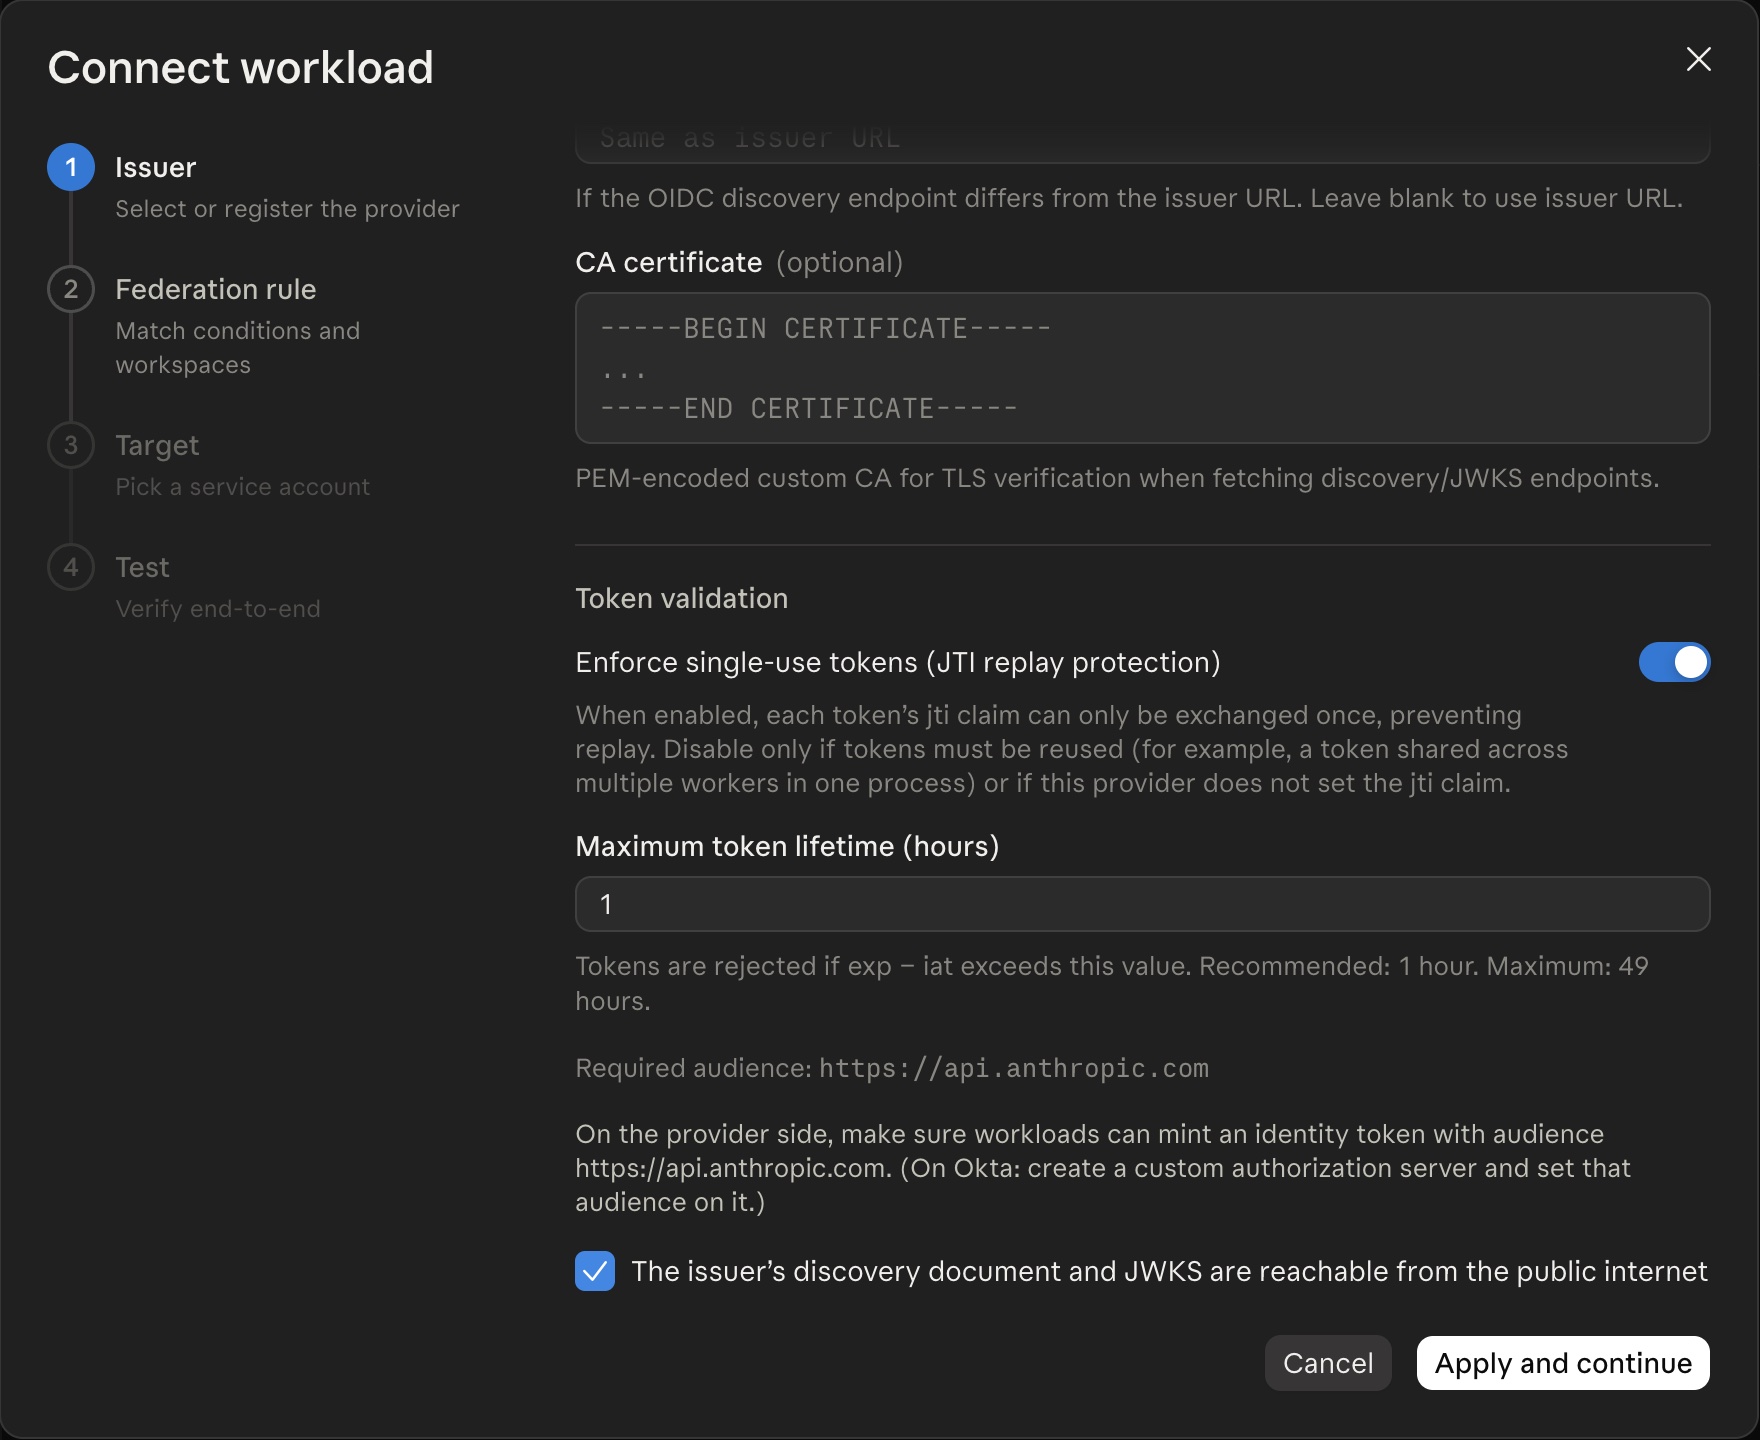
| Field | Enter |
|---|---|
| Name | mintive-us |
| Issuer URL (iss claim) | The issuer URL from Mintive, exactly: https://issuer.mintive.com/us |
| JWKS source | Leave OIDC discovery. |
| Discovery base URL (optional) | Leave blank. |
| CA certificate (optional) | Leave blank. |
| Enforce single-use tokens (JTI replay protection) | Leave on. |
| Maximum token lifetime (hours) | Leave 1. |
| Required audience | Shown as https://api.anthropic.com. Nothing to enter. |
| The issuer's discovery document and JWKS are reachable from the public internet | Tick it. This is true for Mintive's issuer, and the wizard doesn't continue without it. |
Choose Apply and continue.
Don't paste Mintive's keys as inline keys. With discovery, Anthropic always reads Mintive's current signing keys from the issuer URL, but pasted keys stop working the next time Mintive rotates its signing key.
3. Connect workload: Federation rule
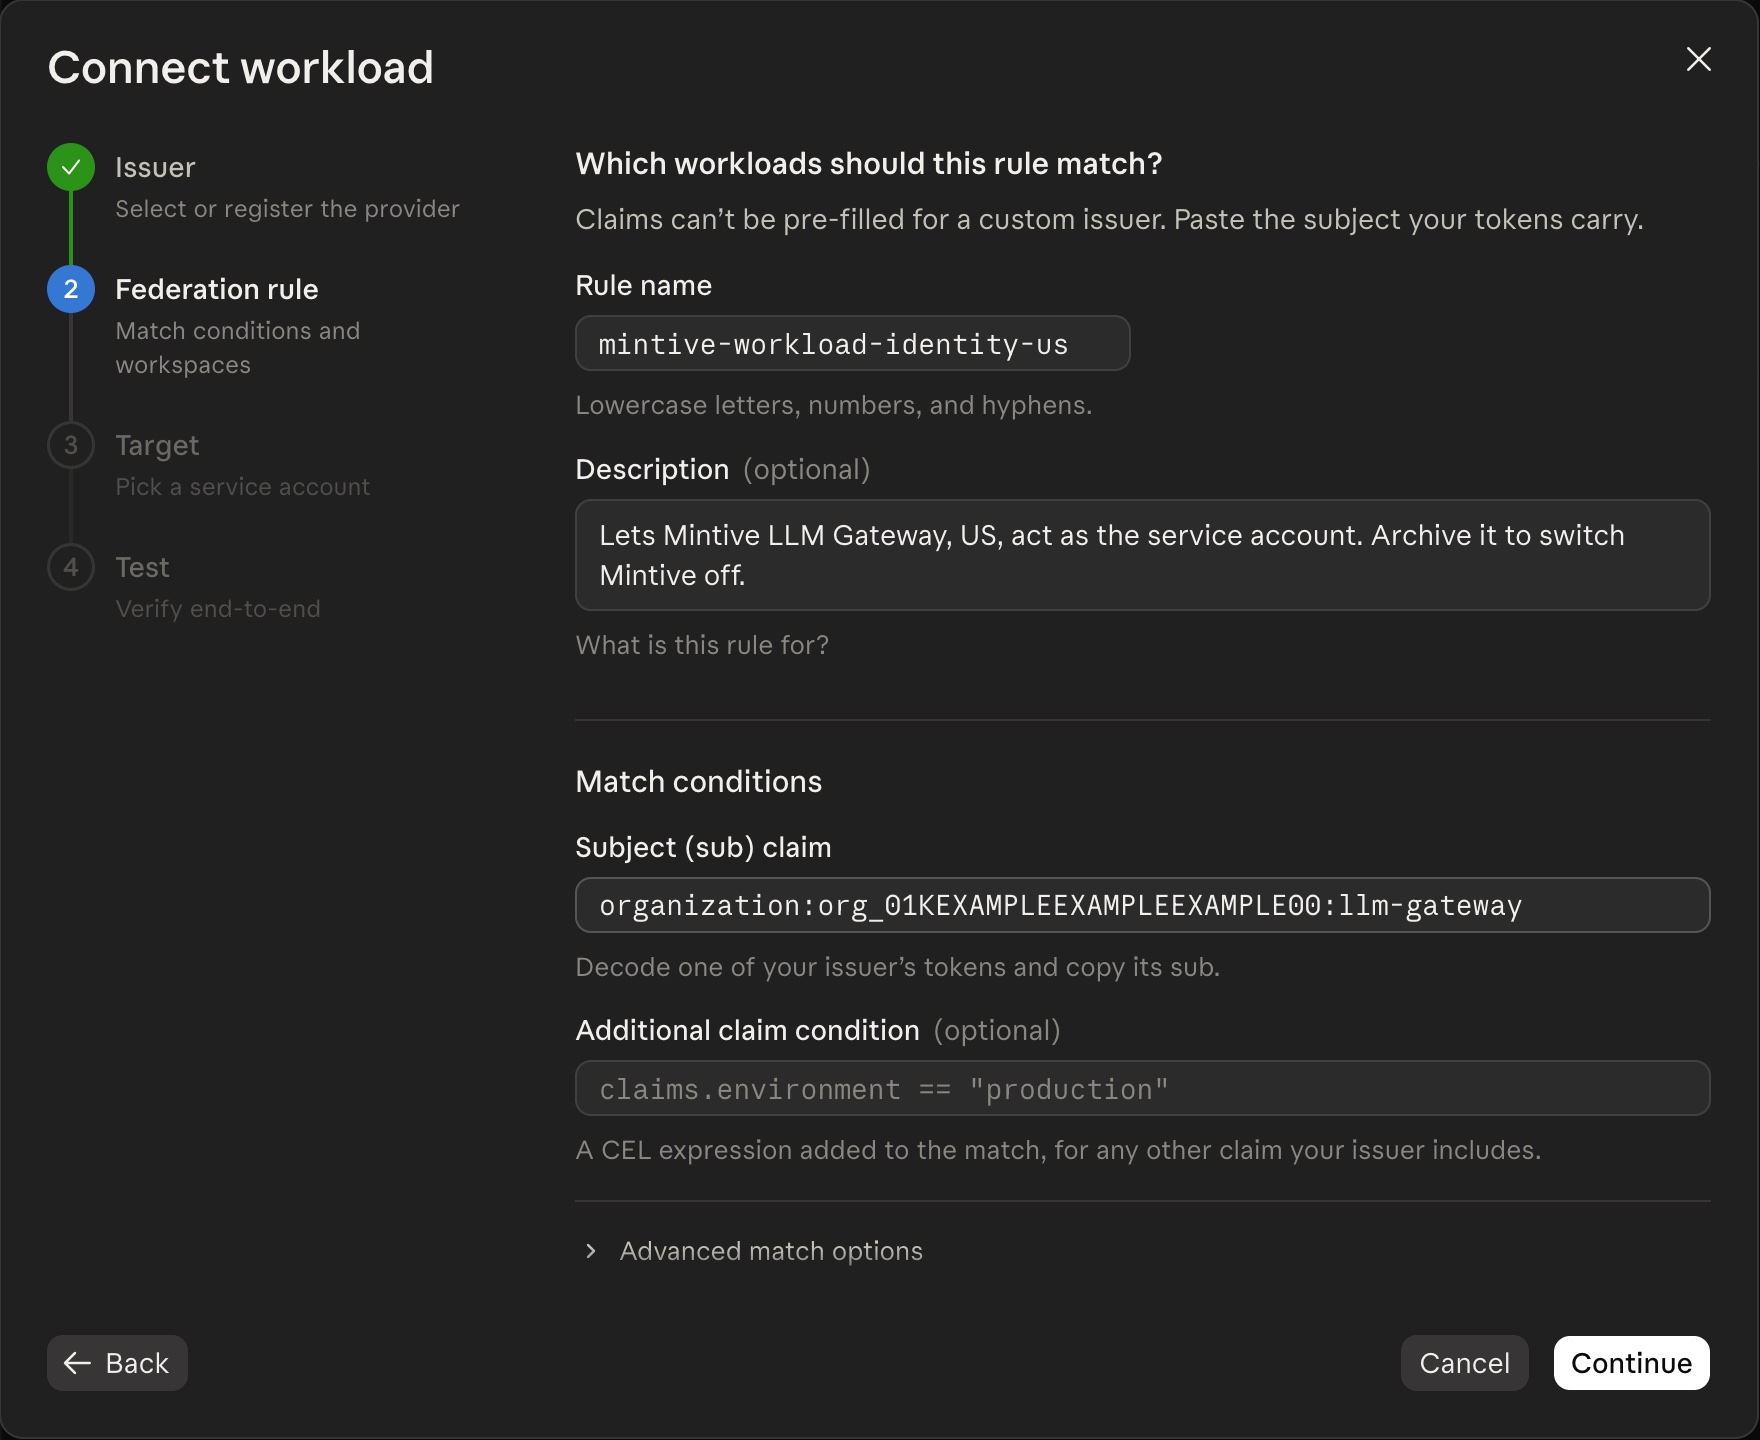
| Field | Enter |
|---|---|
| Rule name | mintive-workload-identity-us |
| Description (optional) | Lets Mintive LLM Gateway, US, act as the service account. Archive it to switch Mintive off. |
| Subject (sub) claim | The subject from Mintive, exactly, with no * at the end. |
| Additional claim condition (optional) | Leave blank. |
| Advanced match options | Don't open it (see the caution below). |
| All workspaces (including future ones) | Leave unticked. |
| Workspaces | Select only mintive-us. |
| Advanced rule options: OAuth scope | Leave workspace:developer, on its own. |
| Advanced rule options: Token lifetime | Leave 10 minutes (default). |
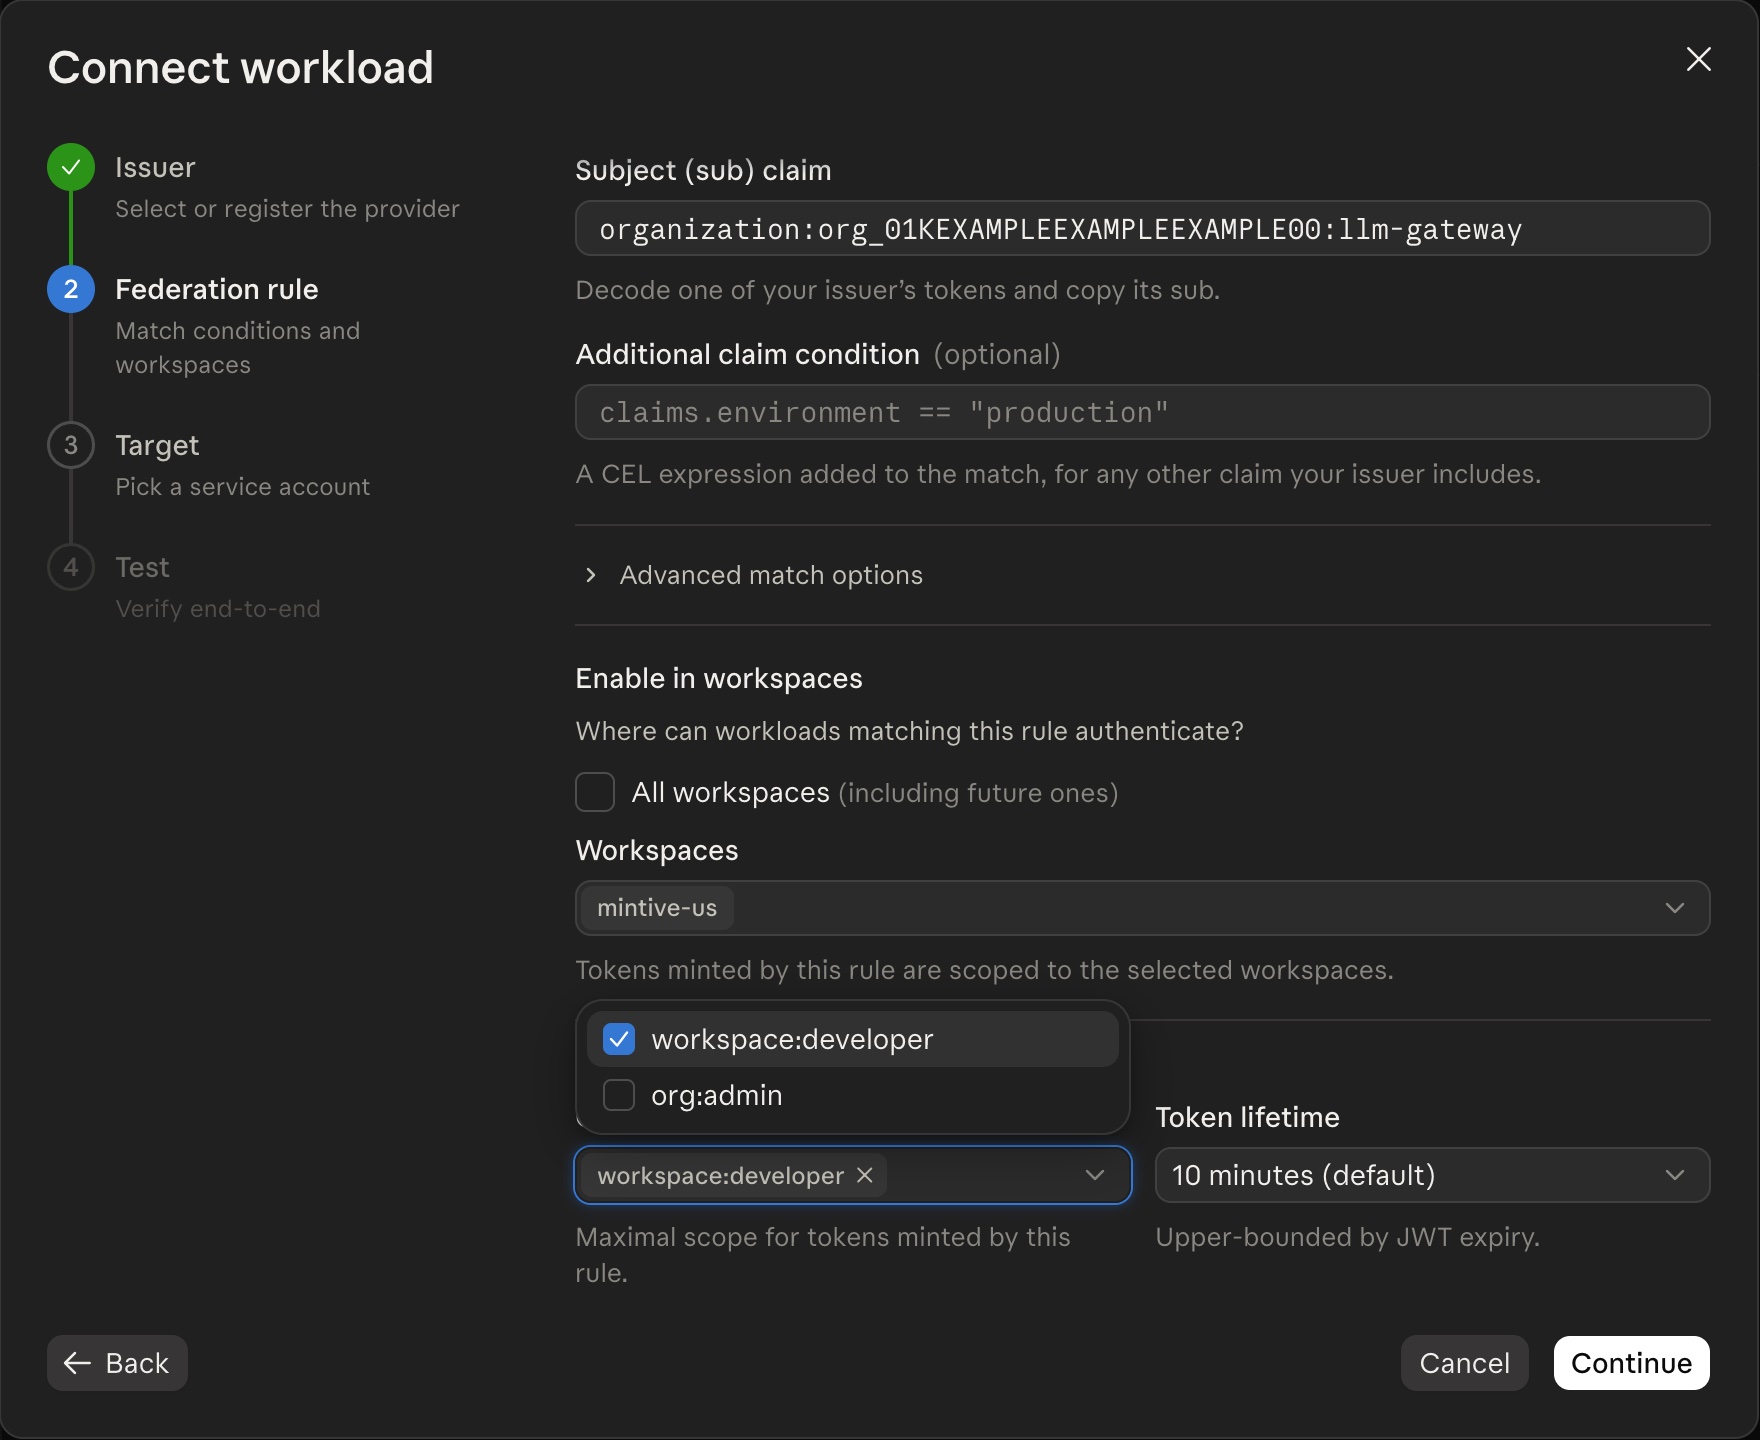
Choose Continue.
The OAuth scope list allows more than one choice, and org:admin would give Mintive administrator access to your whole Anthropic organization. workspace:developer gives the same access as an API key in the one workspace, which is all Mintive needs.
A trailing * makes the rule match any subject that starts with the text before it, not only yours.
Opening this section switches the match to Customized, which takes precedence over the fields above. Its subject pattern starts empty, so Continue then fails with "Enter a subject pattern". If that happens, choose Re-seed from guided fields in that section.
4. Connect workload: Target
Choose New account.
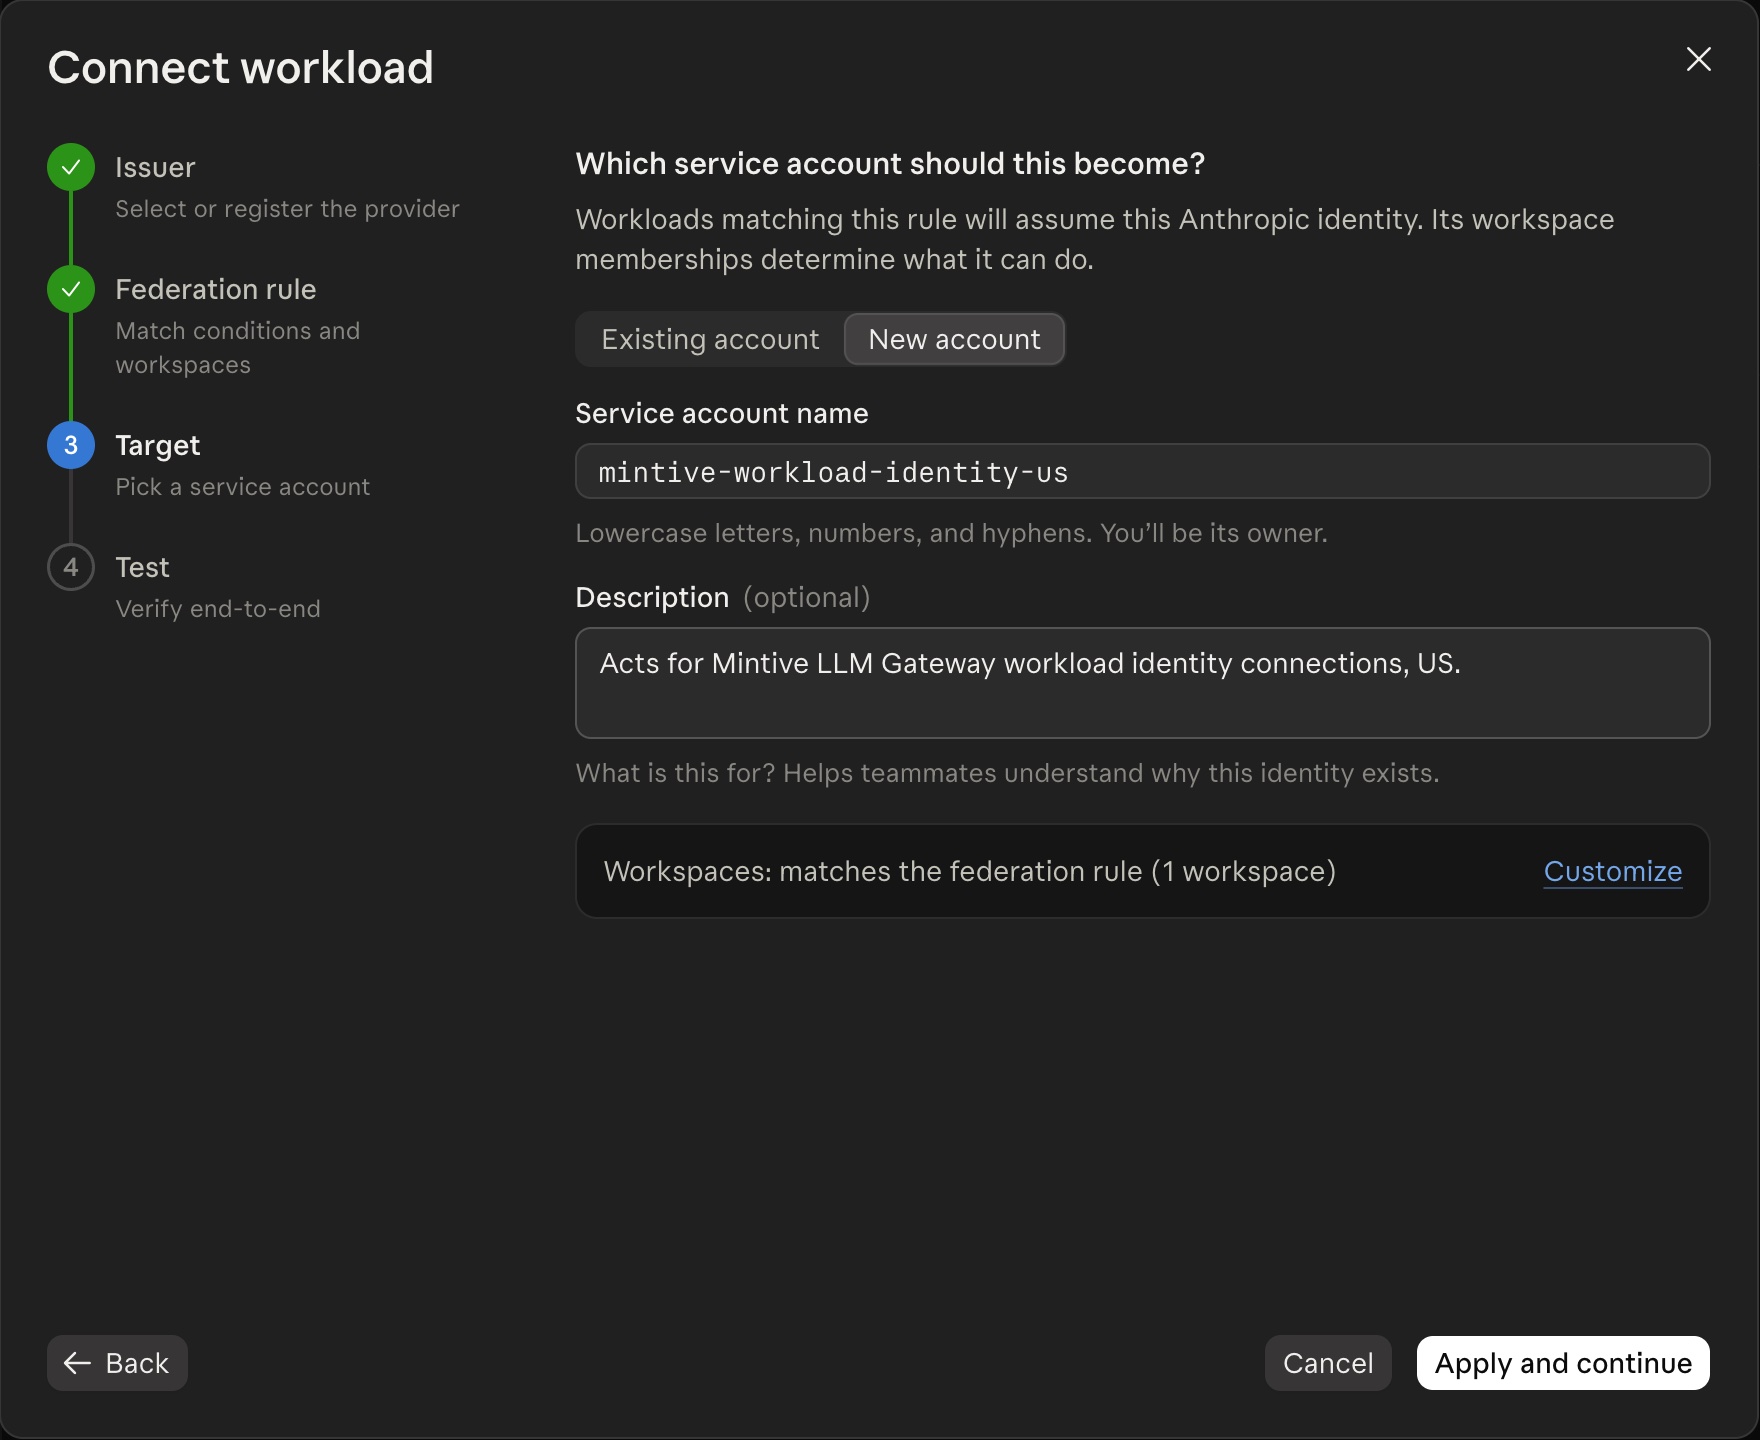
| Field | Enter |
|---|---|
| Service account name | mintive-workload-identity-us |
| Description (optional) | Acts for Mintive LLM Gateway workload identity connections, US. |
| Workspaces | Leave as it is. It matches the federation rule (1 workspace). |
Choose Apply and continue, which creates the issuer, the rule and the service account.
5. Connect workload: Test
The last step shows four IDs together, a curl command, and a test that waits for a first sign-in.
- Copy the four IDs: organization ID, federation rule ID, service account ID and workspace ID.
- Close the wizard without running the
curlcommand. The command needs a token that only Mintive can sign, so the wizard's test times out, which is expected. The issuer, rule and service account stay in place, and Mintive's Test connection is the real test.
6. Paste the IDs into Mintive
Paste the four IDs into the Copy the four IDs step in Mintive, then continue with Finish in Mintive. The organization ID is your Anthropic organization's ID (a UUID), not your Mintive organization's ID, which starts with org_ and appears in the subject.
Optional: limit the rule to inference only
workspace:developer gives the same access as an API key in the workspace, including files, skills and agents, none of which Mintive uses. The narrower workspace:inference scope allows only what Mintive does use: listing models, sending messages (including streaming, prompt caching and tools) and counting tokens.
The Claude Console doesn't offer workspace:inference, so you set it through Anthropic's Admin API, signed in as an organization admin. After the rule exists, in a terminal:
-
Install Anthropic's
antcommand-line tool if you don't have it (on a Mac,brew install anthropics/tap/ant), then sign in as an admin. A browser opens for you to approve.ant auth login --profile admin --scope "org:admin" -
Change the rule's scope, using your rule ID (
fdrl_…). The command prints the rule ID and its new scope.RULE_ID=fdrl_your_rule_idANTHROPIC_AUTH_TOKEN=$(ant auth print-credentials --profile admin --access-token) && curl --fail-with-body -sS -X POST "https://api.anthropic.com/v1/organizations/federation_rules/$RULE_ID" -H "authorization: Bearer $ANTHROPIC_AUTH_TOKEN" -H "anthropic-version: 2026-10-21" -H "content-type: application/json" -d '{"oauth_scope":"workspace:inference"}' | python3 -c 'import sys,json; d=json.load(sys.stdin); print(d.get("id"), d.get("oauth_scope"))' -
Sign the admin profile out, so the admin sign-in isn't left on the machine.
ant auth logout --profile adminIf you use another
antprofile day to day, switch back to it withant profile activate <profile-name>.
Mintive's Limit the rule to inference only step shows the same commands with your rule ID filled in, once you've pasted it. Afterwards, run Test connection in Mintive again. To go back, repeat step 2 with workspace:developer.
Switch Mintive off (Anthropic)
- Archive the rule. New tokens stop at once, and a token Mintive already holds keeps working until it expires, at most 10 minutes later. An archived rule can't be restored, so to switch back on, create a new rule and give Mintive its ID.
- For an immediate cut-off, archive the rule and then the workspace. Archiving the workspace cuts off issued tokens at once. It can't be undone, and it affects everything in the workspace.
OpenAI
You create a project, an identity provider and a mapping, which also creates the service account. At the end you copy two IDs back into Mintive. Create the project first, because the mapping form lists only the projects that existed when its page was opened.
1. Create a project for Mintive
In the OpenAI platform, go to Organization settings, then Projects, and choose Create.
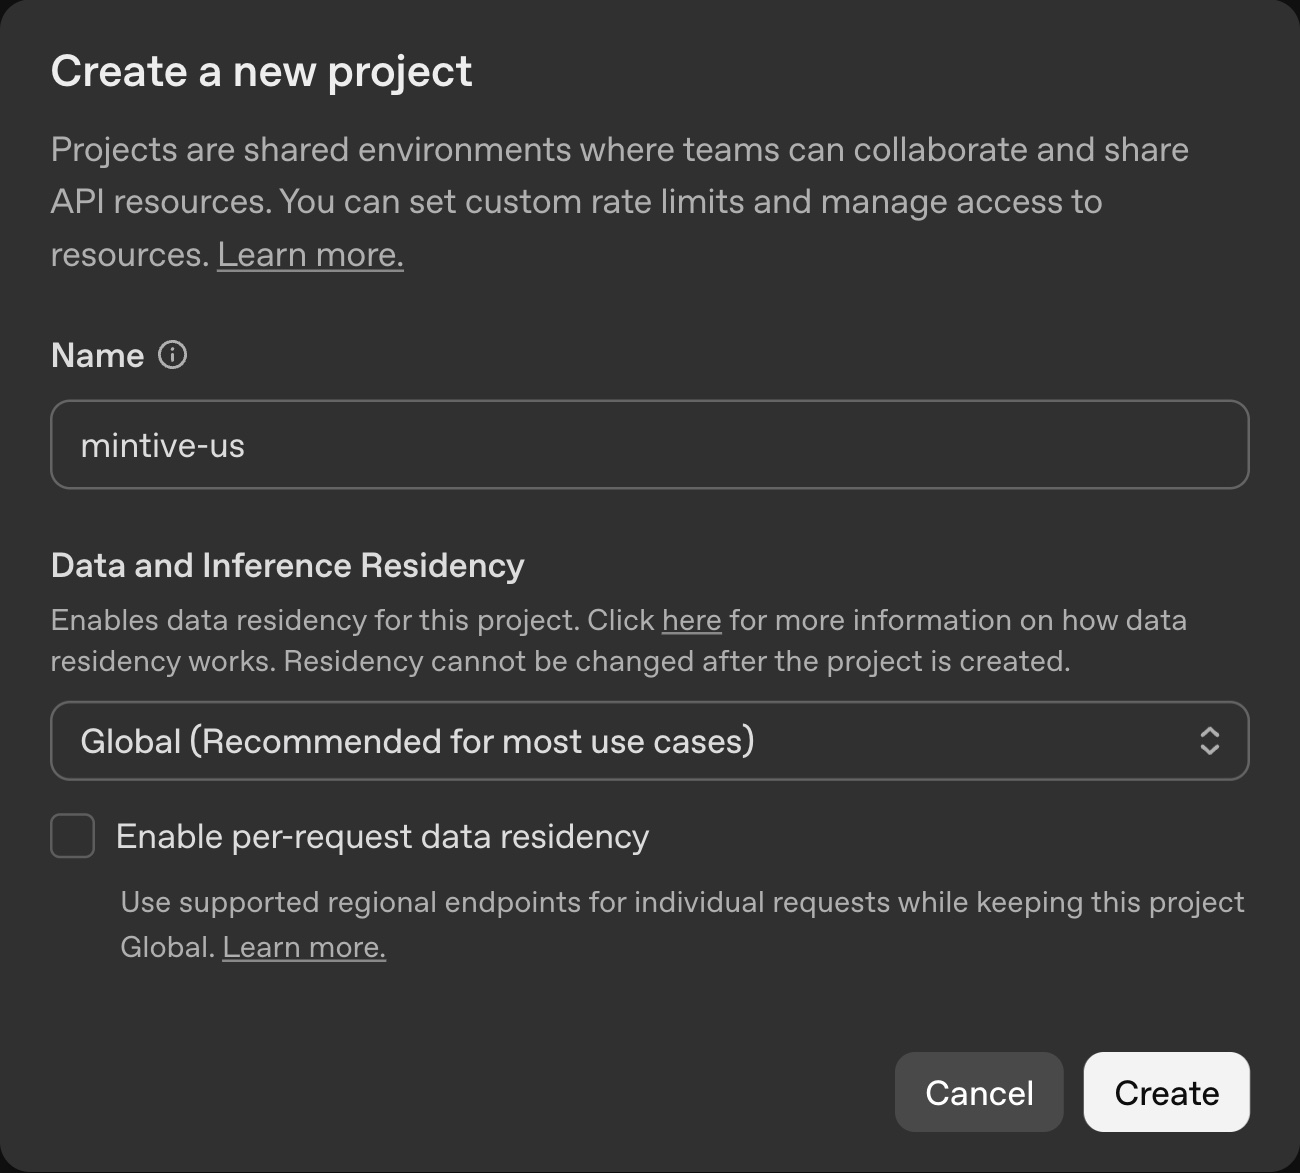
| Field | Enter |
|---|---|
| Name | mintive-us |
| Data and Inference Residency | Leave Global (Recommended for most use cases). It can't be changed after the project is created. |
| Enable per-request data residency | Leave unticked. |
Choose Create.
2. Set up the project
Open the project's settings.
API key governance (recommended). Under General, then API Key Governance, turn on Disable all new API key creation and choose Save at the bottom of the page. Mintive never needs an API key in this project, so this keeps anyone from creating one there. Service accounts without API keys can still be created, which is all the next steps need.
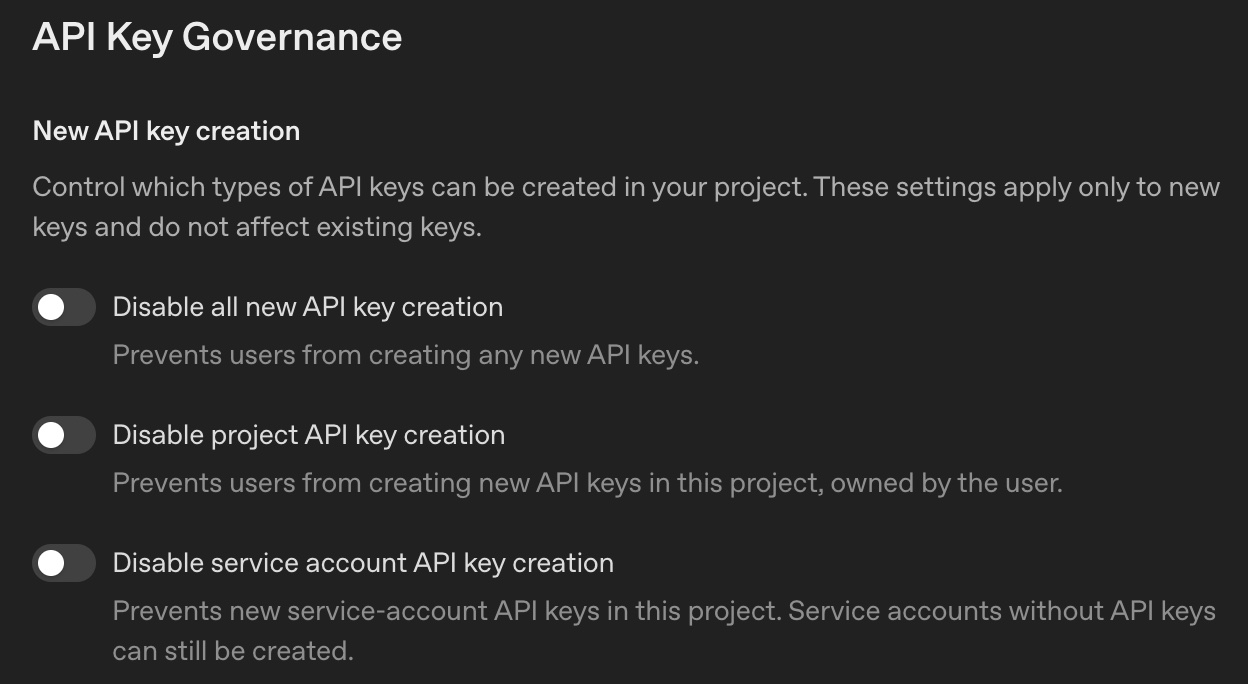
Limits (optional). Under Project spend limit, choose Edit spend limit to set a limit, and add spend alerts if you want them. As with Anthropic, if this limit is reached before your Mintive policy budget, requests fail with OpenAI's error. Don't block the models you plan to use through Mintive under Blocked models, or those requests fail.
3. Create the identity provider
Go to Organization settings, then Security, then Workload Identity Provider, and choose Create identity provider.
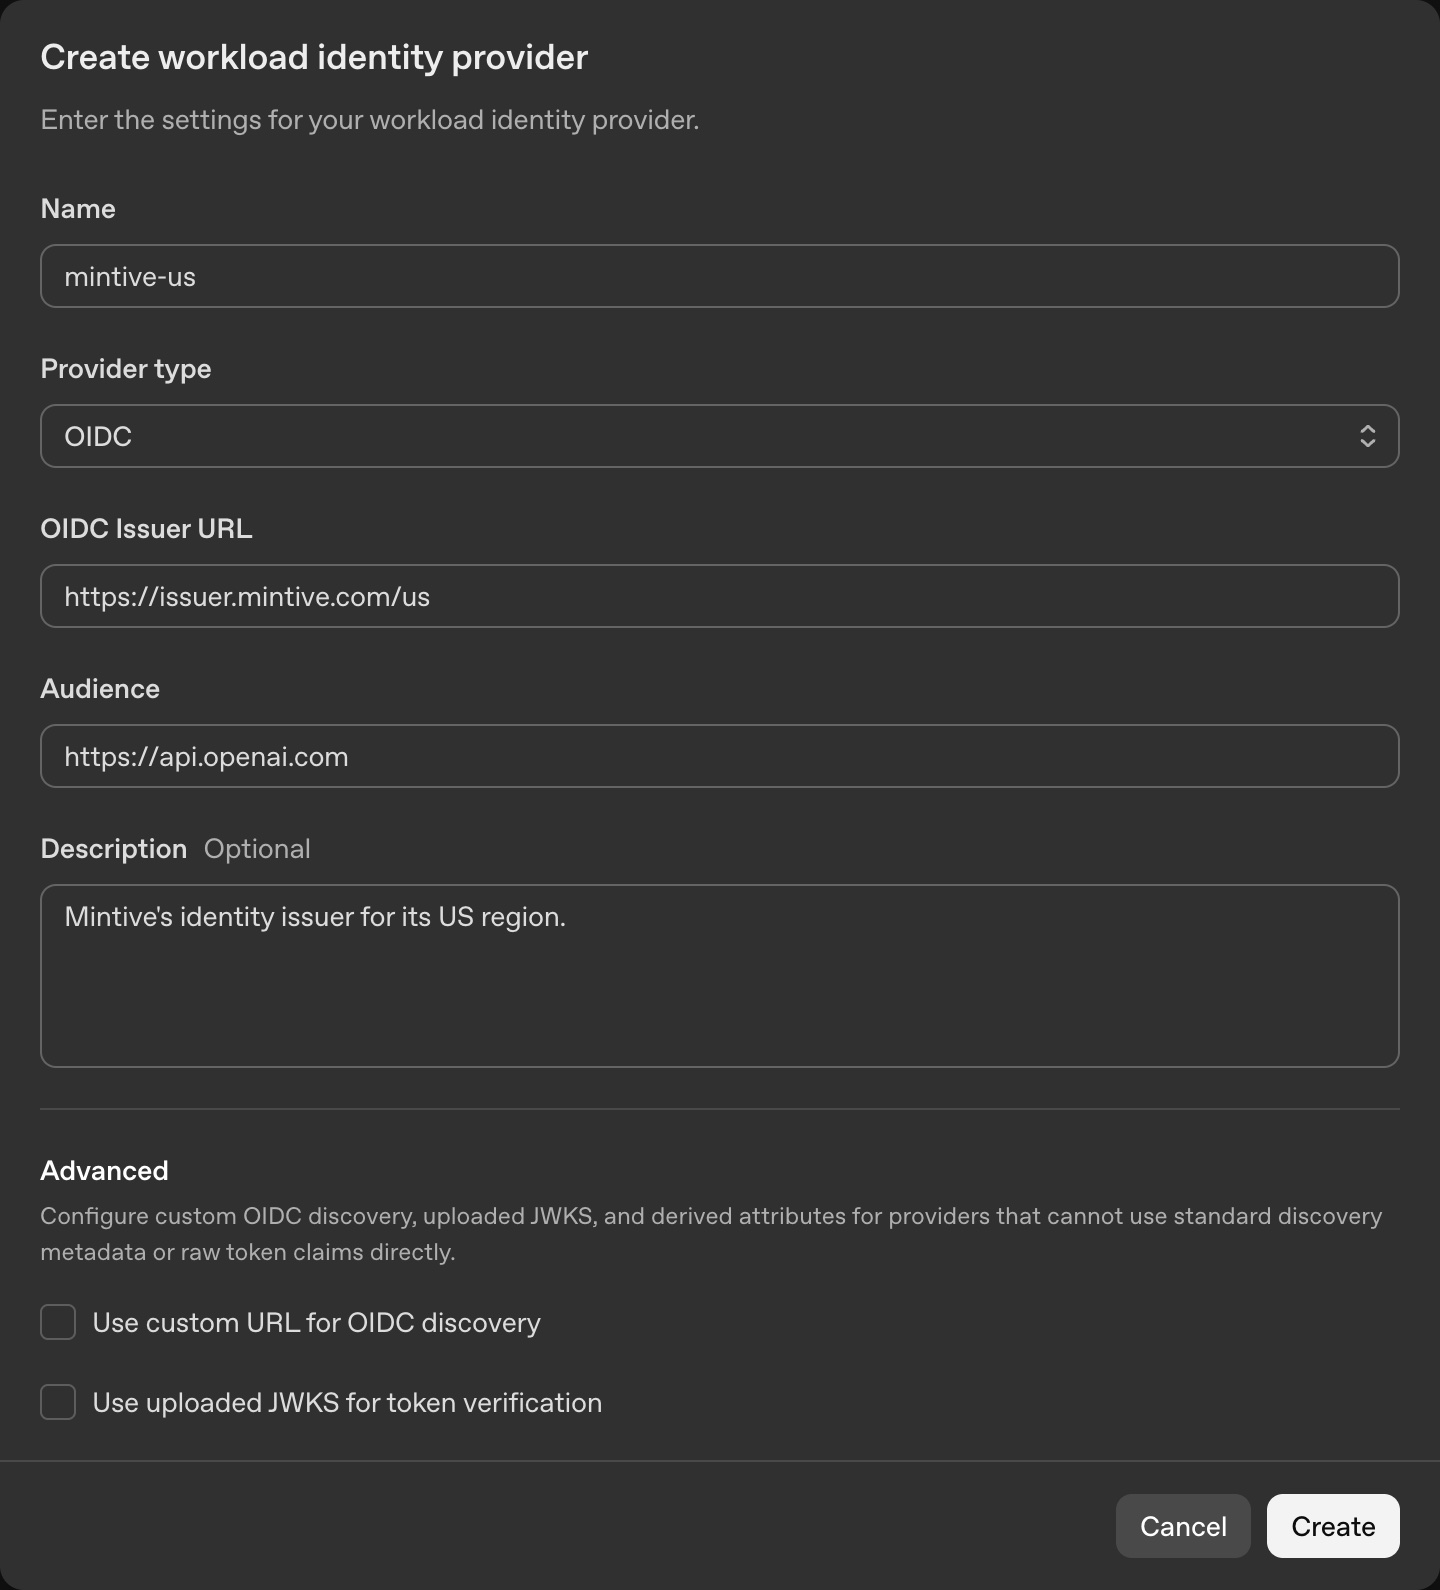
| Field | Enter |
|---|---|
| Name | mintive-us |
| Provider type | Leave OIDC. |
| OIDC Issuer URL | The issuer URL from Mintive, exactly: https://issuer.mintive.com/us |
| Audience | Type https://api.openai.com. |
| Description (optional) | Mintive's identity issuer for its US region. |
| Use custom URL for OIDC discovery | Leave unticked. |
| Use uploaded JWKS for token verification | Leave unticked. |
Choose Create.
It shows https://api.openai.com in grey as an example, but you have to type it.
OpenAI then reads Mintive's current signing keys from the issuer URL. Uploaded keys (Use uploaded JWKS) stop working the next time Mintive rotates its signing key, and Mintive's Test connection can't tell the difference until then. You can check both settings later by editing the provider.
4. Create the mapping
Open the provider you just created (Security, then Workload Identity Provider, then mintive-us) and choose Create mapping.
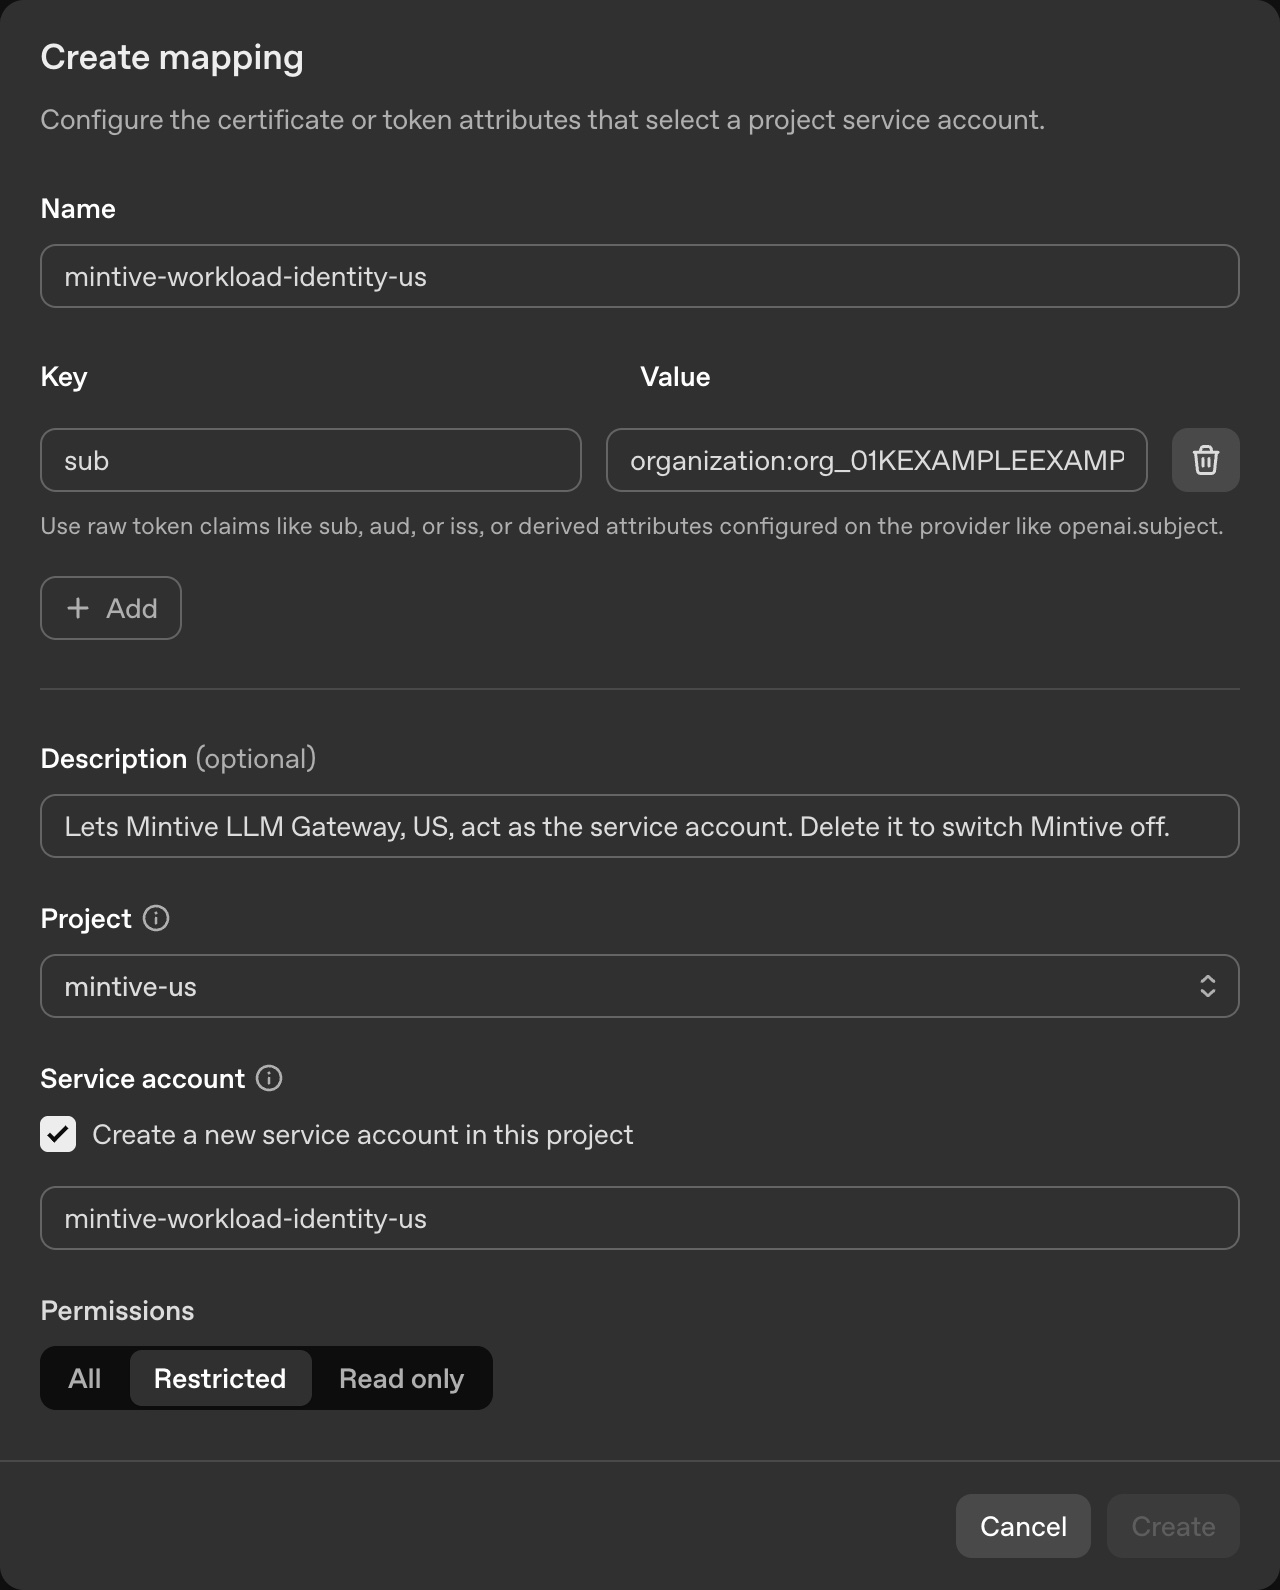
| Field | Enter |
|---|---|
| Name | mintive-workload-identity-us |
| Key | Leave sub. |
| Value | The subject from Mintive, exactly. Add no other rows. |
| Description (optional) | Lets Mintive LLM Gateway, US, act as the service account. Delete it to switch Mintive off. |
| Project | mintive-us. If it isn't in the list, reload the page and open Create mapping again. |
| Service account | Leave Create a new service account in this project ticked, and name it mintive-workload-identity-us. |
| Permissions | Restricted, set as below. |
Choose Restricted under Permissions, then set:
| Permission | Set to |
|---|---|
| List models | Read |
| Model capabilities | Expand it, then set Responses (/v1/responses) to Write and Chat completions (/v1/chat/completions) to Request. Set every other endpoint under it to None. The row then shows Mixed. |
| Every other row | Leave None. |
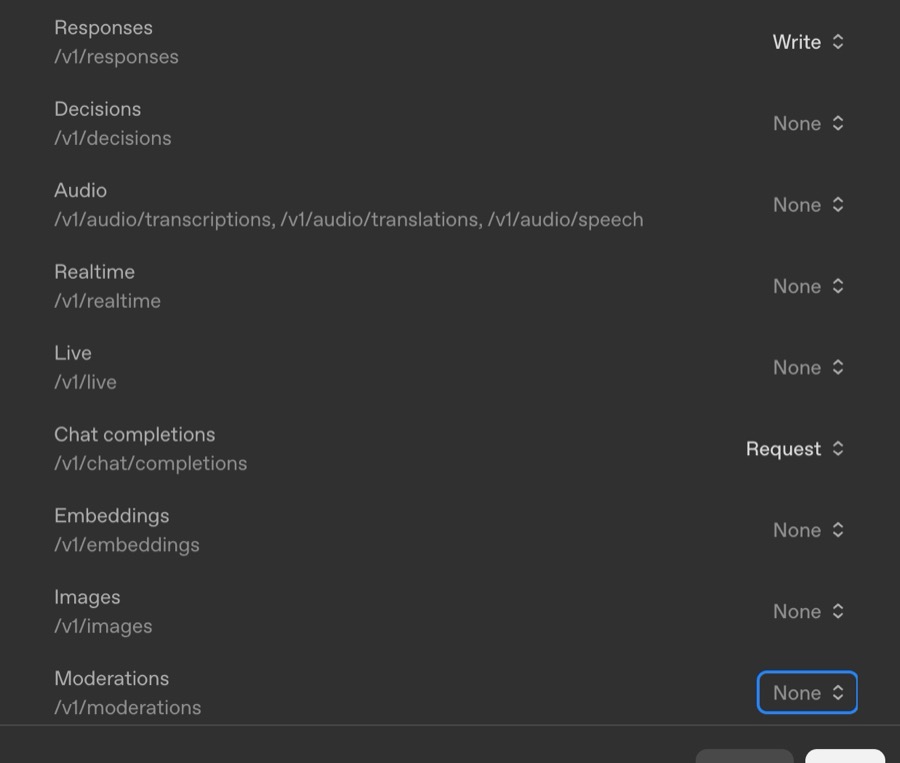
These permissions cover exactly what Mintive's requests use: listing models, and the Responses and Chat Completions endpoints. Mintive's Test connection checks the token for all three and names any that is missing, using the labels from this form.
Choosing Request on the Model capabilities row turns on every endpoint under it, including audio, images and embeddings. Expand the row and set the endpoints one by one.
Choose Create. The mapping then appears on the provider's page as a card showing its service account, project, permissions, and the sub key and value. It isn't labelled "mapping" there, so to change it later, use the Edit button on that card.
To create the service account yourself first instead, go to the project's settings, then Members, and choose + Service account, which asks only for a name. Then untick Create a new service account in this project in the mapping and choose it.
5. Copy the two IDs
OpenAI's settings don't show these IDs as text:
- Identity provider ID (
idp_…): the last part of the address of the identity provider's page. - Service account ID (
user-…): hover over the info icon next to the service account's name on the mapping's card.
6. Paste the IDs into Mintive
Paste the two IDs into the Copy the two IDs step in Mintive, then continue with Finish in Mintive.
Switch Mintive off (OpenAI)
- Delete the mapping. OpenAI stops issuing tokens, and tokens Mintive already holds stop working within about a minute.
- Or delete the identity provider. OpenAI can't disable a provider, only delete it. To switch back on, create it again and give Mintive the new IDs.
Finish in Mintive
Create the connection
On the setup screen you opened at the start:
| Step | Enter |
|---|---|
| Copy the four IDs (Anthropic) or Copy the two IDs (OpenAI) | The IDs from the provider, each in its own field. |
| Name the connection | Leave the suggested label (Production Anthropic or Production OpenAI) or use your own. Your policies show this name. |
| Limit the rule to inference only (Anthropic, optional) | See Optional: limit the rule to inference only. Skip it to keep workspace:developer. |
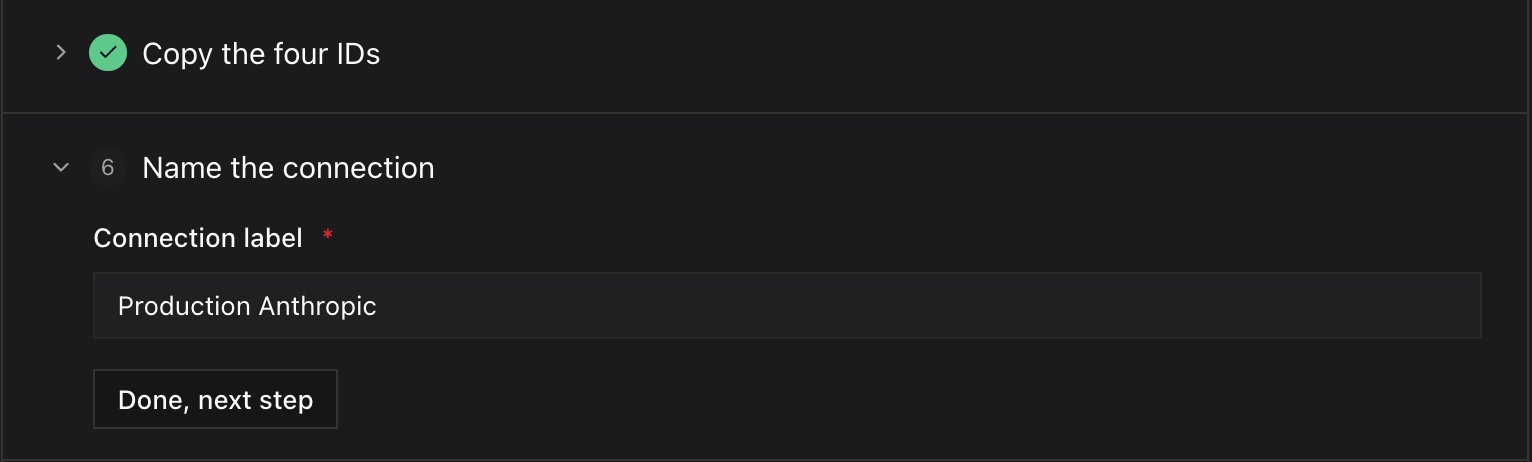
Choose Create connection. The connection is created as Pending, and Mintive sends no requests through it until a test passes.
Test the connection
Choose Test connection. Mintive signs an identity token, exchanges it at the provider for an access token, and makes a call with that token. The result appears just above the button.
- Connection is active: the provider accepted Mintive. The result shows what the provider granted: for Anthropic, the scope (
workspace:developer, orworkspace:inferenceif you narrowed it); for OpenAI, the permissions, as OpenAI's form labels them. The connection is now Active, so choose Finish setup. - A warning: the provider refused, or the token is missing something Mintive needs. The warning says what to check, and the values you entered at the provider are listed above it so you can compare them with the provider's settings. Fix the provider's side and choose Test connection again. If an ID you pasted is wrong, remove the connection and add it again, because a workload identity connection's IDs can't be edited.
Use the connection in a policy
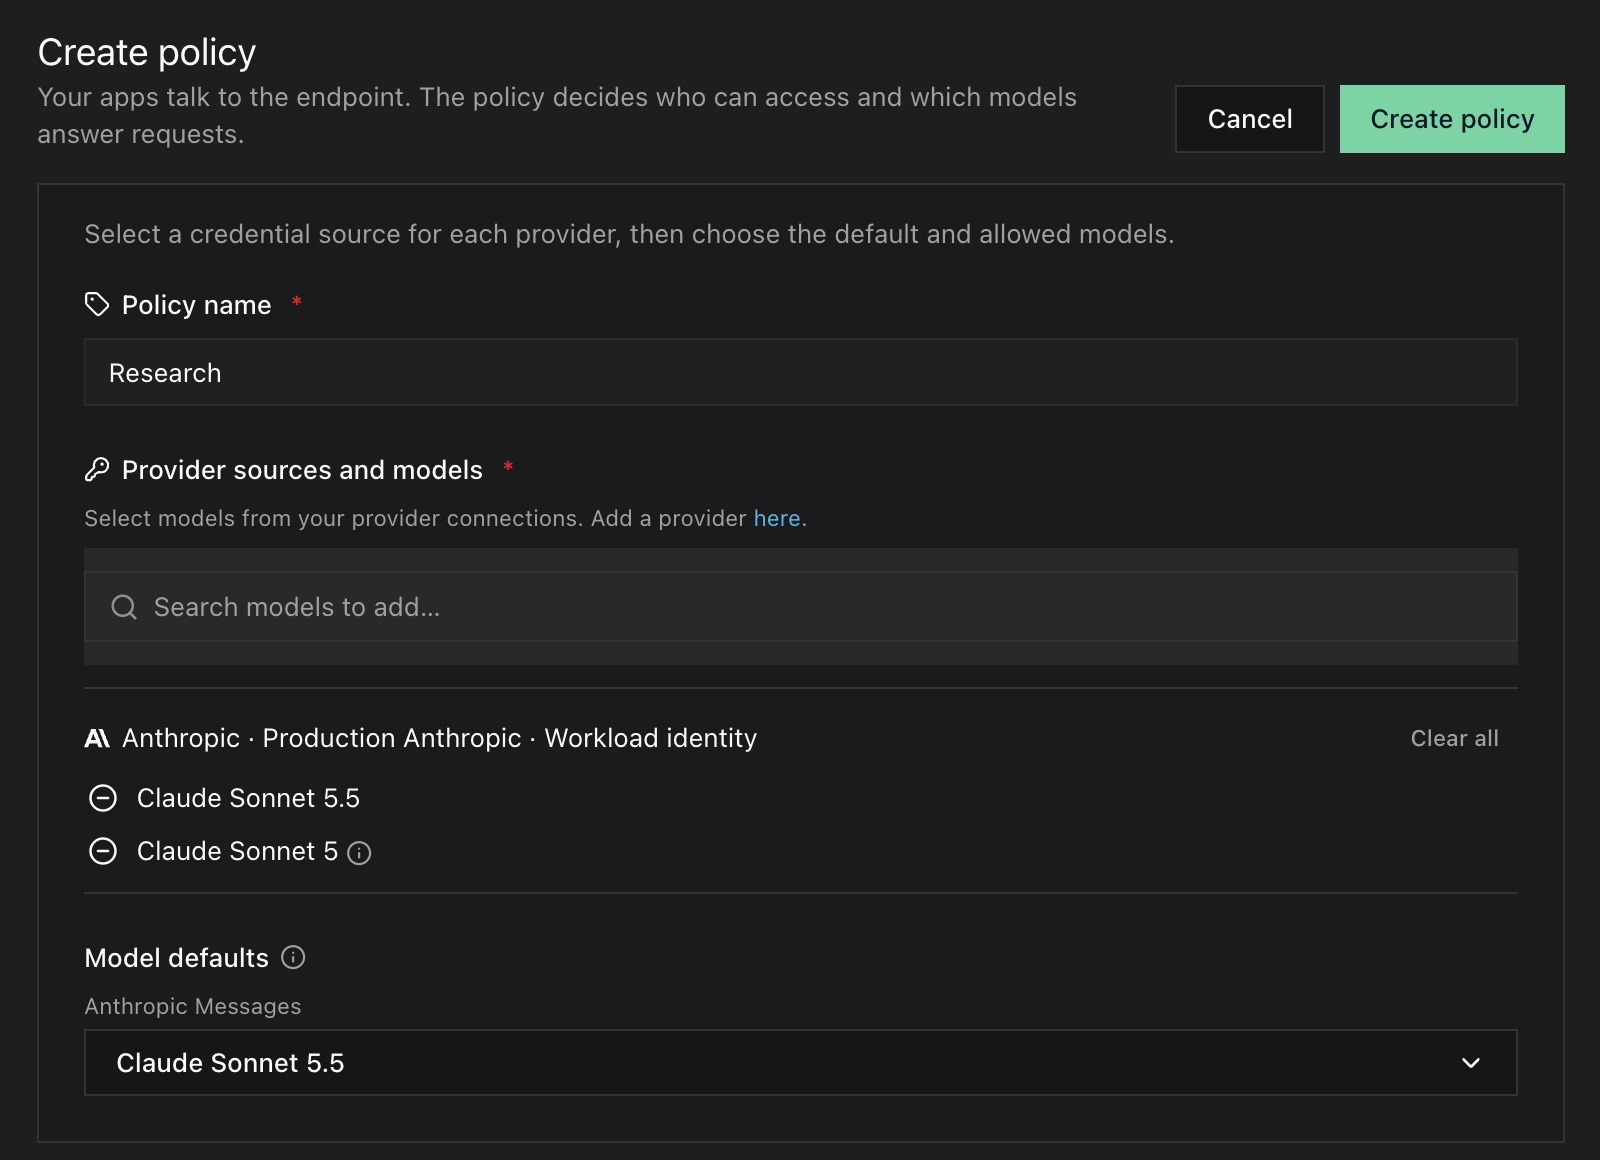
The gateway uses a connection only through a policy. Go to LLM gateway, then Policies, and choose Create policy (or edit an existing policy). Under Provider sources and models, search for models and choose them from the new connection. Only active connections are listed, and a workload identity connection shows Workload identity where an API key connection shows the last characters of its key.
Check a connection later
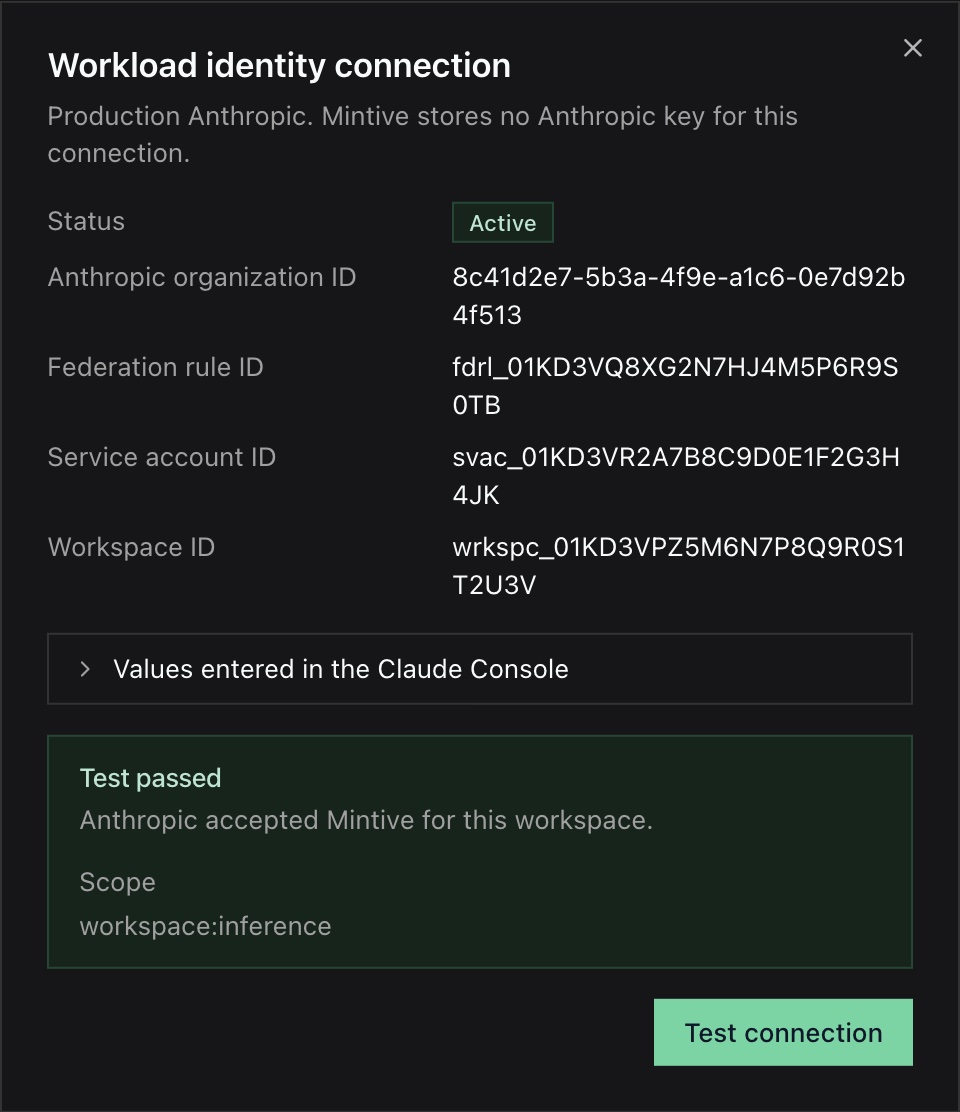
On the Providers list, choose the connection's edit (pencil) button. The connection opens in a panel on the right, showing its status, the IDs you entered, and the values entered at the provider. Choose Test connection at any time, for example after changing the rule or mapping at the provider. A passing test shows Test passed and what the provider granted.
Remove the connection
On the Providers list, choose the connection's remove (bin) button. Policies that use it can no longer make requests through it, and Mintive stops asking the provider for tokens. This doesn't change anything at the provider, so to stop the provider trusting Mintive as well, archive the rule (Anthropic) or delete the mapping (OpenAI), as described in Switch Mintive off for Anthropic and for OpenAI.
Next steps
- Provider and model selection: restrict which models a policy exposes
- Budgets: cap spend for the policy
- Monitoring and analysis: see which models and providers agents use