Set up the Salesforce MCP server
The Mintive Salesforce MCP server gives AI agents access to Salesforce data — querying, creating, and modifying records across standard and custom objects. This guide covers creating an External Client App in Salesforce and connecting it to the Mintive-hosted Salesforce server.
Prerequisites
- A Mintive admin account
- A Salesforce org (Developer Edition, sandbox, or production) with Administrator access
- The "Customize Application" permission in Salesforce
Choose a connection method
The Salesforce connector offers two methods in the install drawer:
| Method | Who the tool calls run as | Use it for |
|---|---|---|
| OAuth | Each person, after they sign in with their own Salesforce account | People working with their own data and permissions |
| Integration User | One shared, API-only Salesforce user. Nobody signs in | Agents and service workflows that shouldn't depend on one employee's account |
Pick your method in the tabs below.
- OAuth
- Integration User
Create an External Client App
Salesforce requires an External Client App for OAuth authentication — do not use a Connected App.
-
In Salesforce, open Setup.
-
In the Quick Find box, type
external clientand select External Client App Manager. -
Click New External Client App.
-
Fill in the Basic Information section with an app name (for example, "Mintive").
-
Expand API (Enable OAuth Settings) and check Enable OAuth.
-
In the Callback URL field, enter the callback for your Mintive region:
Mintive region Callback URL US ( app.mintmcp.com)https://app.mintmcp.com/oauth/callbackEU ( eu.mintmcp.com)https://eu.mintmcp.com/oauth/callbackThe install panel in Mintive shows the callback for your organization.
-
Under Selected OAuth Scopes, add the three required scopes:
Scope Description apiManage user data via APIs sfap_apiAccess the Salesforce API Platform refresh_token, offline_accessPerform requests at any time -
Under security settings:
- Select Issue JSON Web Token (JWT)-based access tokens for named users
- Select Require Proof Key for Code Exchange (PKCE) extension
- Deselect all other options
-
Click Create.
Allow up to 30 minutes for the External Client App to become active before proceeding.
Control who can connect
By default a new External Client App lets any user in the org authorize it. To limit the connector to specific people, switch the app to admin-approved access and link a permission set to it. Salesforce then checks, at every connection attempt, that the user holds a linked permission set or profile; users who don't are refused before Mintive receives a token.
Create a permission set
- In Setup, go to Administration > Users > Permission Sets.
- Click New, enter a label (for example, "Mintive Access"), leave License as
--None--, and click Save. - Open System Permissions, click Edit, select API Enabled, and save.
API Enabled is what lets the connector's tool calls reach the Salesforce API. Granting it on this permission set means the one assignment covers both connecting and querying, regardless of the user's profile.
Require admin approval on the app
-
In External Client App Manager, open the app and go to the Policies tab.
-
Click Edit.
-
Expand OAuth Policies and set Permitted Users to Admin approved users are pre-authorized. Confirm the dialog, which warns that users who are not yet approved lose access.

-
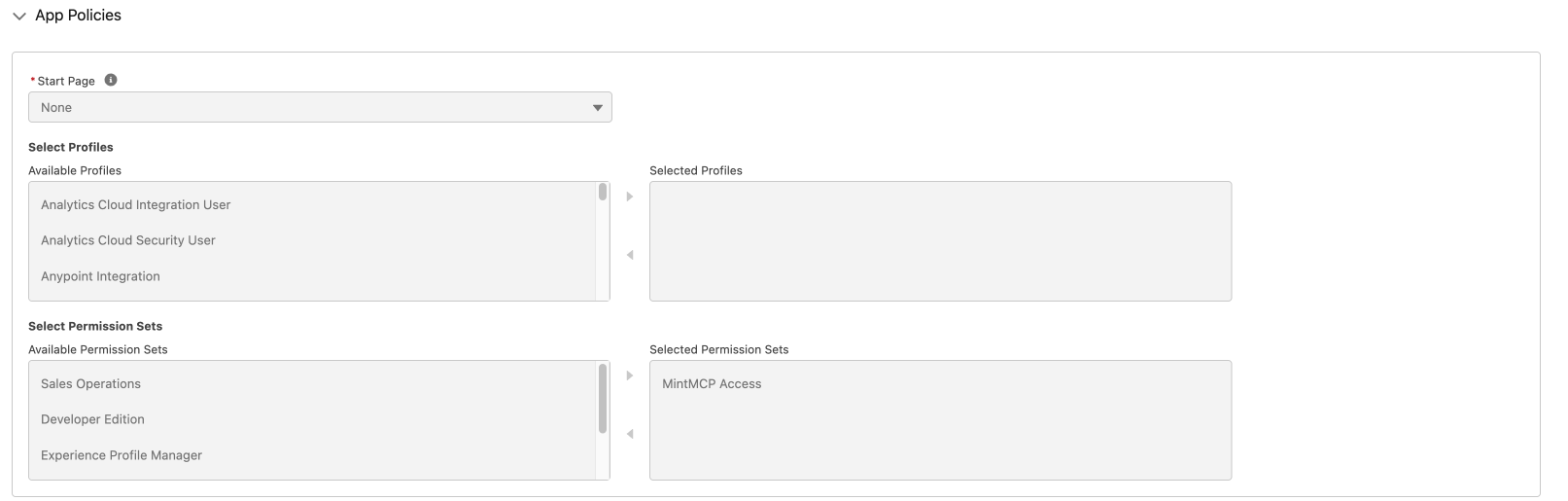
Under App Policies, move the permission set from Available Permission Sets to Selected Permission Sets. Profiles can be linked the same way under Selected Profiles; a user needs only one linked permission set or profile.
-
Click Save.
Being a Salesforce administrator does not bypass this check. Admins who need the connector must hold a linked permission set or profile like everyone else.
Review the app authorization settings
The App Authorization block under OAuth Policies has two settings that can block connections for some users:

- IP Relaxation defaults to Enforce IP restrictions. If a user's profile has login IP ranges, Salesforce accepts their login but refuses Mintive's token request, because it comes from Mintive's servers rather than the user's network. Set IP Relaxation to Relax IP restrictions for apps used by such profiles.
- High Assurance Session Required blocks any user whose Salesforce session did not use multi-factor authentication. Leave it off unless every connecting user logs in with MFA.
Assign the permission set to users
Each person who will use the connector needs the linked permission set:
- In Setup, go to Administration > Users > Permission Sets and select the set.
- Click Manage Assignments, then Add Assignment.
- Select the users, click Next, then Assign.
The same assignment can be made from a user's record under Permission Set Assignments > Edit Assignments. Assignments take effect immediately, so a user who was refused can connect again as soon as the set is added.
Copy the Consumer Key and Secret
- In External Client App Manager, open the app you just created.
- Go to Settings > Consumer Key and Secret.
- Copy the Consumer Key — this is your Client ID.
- Copy the Consumer Secret — this is your Client Secret.
Set up Salesforce in Mintive
- Go to app.mintmcp.com/vmcps?tab=manage-store.
- Find the Salesforce MCP server in the list and click to add it to your store.
- Select the OAuth connection method and enter:
- Client ID: paste the Consumer Key from the previous step
- Client Secret: paste the Consumer Secret from the previous step
- Click Install.
For standard Salesforce orgs, the authorization and token URLs are set automatically. If your org uses a custom domain or routes authentication through an SSO provider, update the URLs:
| Setup | Authorization URL | Token URL |
|---|---|---|
| Standard | https://login.salesforce.com/services/oauth2/authorize | https://login.salesforce.com/services/oauth2/token |
| My Domain | https://{your-domain}.my.salesforce.com/services/oauth2/authorize | https://{your-domain}.my.salesforce.com/services/oauth2/token |
| Okta as IdP | https://{your-company}.okta.com/oauth2/default/v1/authorize | https://{your-company}.okta.com/oauth2/default/v1/token |
When using Okta as an identity provider, the Client ID and Client Secret come from an Okta OAuth application, not the Salesforce External Client App. Salesforce trusts Okta as an IdP and accepts the tokens it issues.
Connect as a user
Each user connects separately: open the Salesforce connector in the MCP store, click Connect, and sign in to Salesforce. If the browser already has a Salesforce session, Salesforce reuses it without asking, so the connection is made as whichever user is signed in. When testing with several accounts, use a private window or sign out of Salesforce first.
To confirm a connection from the Salesforce side, open Login History in Setup. A successful connection appears as a Remote Access 2.0 login with Success status and the External Client App's name in the Application column. Refused connections leave no row there.
Set up an Integration User
Every tool call runs as one shared user on Salesforce's API-only Salesforce Integration license, which most editions include at no extra cost. Mintive gets its tokens with the OAuth client credentials flow, so nobody signs in, and the user's permission set decides what the connector can do for everyone who uses it.
Create the integration user
- In Setup, go to Administration > Users > Users and click New User.
- Set User License to Salesforce Integration and Profile to Minimum Access - API Only Integrations. The username must be unique across all Salesforce orgs.
- Save, then on the user's record open Permission Set License Assignments, click Edit Assignments, and select Salesforce API Integration.
If Salesforce Integration isn't in the license list, check Company Information > User Licenses. Some editions and trials don't include it.
Give it access to data
- Go to Permission Sets and click New. Set License to Salesforce API Integration and save.
- Under Object Settings, grant access to each object the connector needs (for example, Read on Accounts and Opportunities).
- On the same pages, check Field Permissions. Object access alone doesn't expose every field, and a query on a field without permission fails with
INVALID_FIELD. - Click Manage Assignments and assign the permission set to the integration user.
For a read-only agent, grant only Read. Salesforce enforces this on every call, whatever tools the connector exposes.
Enable the client credentials flow
You can enable the flow on the External Client App you use for OAuth, or create a separate app as described in Create an External Client App.
- In External Client App Manager, open the app. Under API (Enable OAuth Settings), select Enable Client Credentials Flow and save. The
apiscope is enough; the flow doesn't userefresh_token. - Go to the Policies tab and click Edit.
- Under OAuth Policies, select Enable Client Credentials Flow and set Run As to the integration user.
- Set Permitted Users to Admin approved users are pre-authorized, and under App Policies add the integration user's permission set (or its profile) to the selected list.
- Save, then copy the Consumer Key and Consumer Secret from Settings > Consumer Key and Secret.
Allow a few minutes for changes to take effect.
Configure the connector in Mintive
- Add the Salesforce MCP server from the store, as in Set up Salesforce in Mintive.
- Select the Integration User connection method.
- Set Token URL to your org's My Domain:
https://{your-my-domain}/services/oauth2/token, for examplehttps://acme.my.salesforce.com/services/oauth2/token. The client credentials flow doesn't work onlogin.salesforce.comortest.salesforce.com. - Enter the Consumer Key as Client ID and the Consumer Secret as Client Secret, and leave Scope empty.
- Click Install.
No one needs to connect. To check the setup, run a tool call and look for a Remote Access 2.0 login in the integration user's Login History.
Security considerations
- With OAuth, each user authenticates individually, so tool calls are attributed to their Salesforce identity and limited by their existing Salesforce permissions.
- With Integration User, every tool call is attributed to the integration user and limited by its permission set. Anyone with access to the connector acts with those permissions, so grant only what the shared use case needs.
- Store the Consumer Key and Consumer Secret securely — both are required to authenticate as your Salesforce app.
- API calls through the MCP server count against your org's API quota. Monitor usage in Salesforce Setup under API Usage.
Troubleshooting
- Connecting fails with
OAUTH_APP_ACCESS_DENIED: user is not admin approved to access this app: the app requires admin approval and this user holds none of the permission sets or profiles linked on the app's Policies tab. Assign a linked permission set to the user and have them connect again. A permission set with a similar name that is not linked on the app does not count, and administrator rights do not bypass the check. - Connecting fails with
OAUTH_APP_BLOCKED: invalid session security level: High Assurance Session Required is enabled on the app and the user signed in without MFA. Turn the setting off under the app's OAuth Policies, or have the user sign in with MFA. - Connecting fails with
OAuth token exchange failed: 400 invalid_grant: the user's profile has login IP ranges and the app enforces IP restrictions, so Salesforce refused the token request from Mintive's servers. Login History shows the attempt with status Restricted IP. Set the app's IP Relaxation to Relax IP restrictions. - The connection succeeds but every tool call fails with
API_CURRENTLY_DISABLED: the user's profile and permission sets lack the API Enabled system permission. Add it to the linked permission set. - Integration User calls fail with
invalid_app_access: user is not admin approved to access this app: the integration user's permission set or profile isn't selected under the app's App Policies. Add it and wait a few minutes. - Integration User calls fail with
no client credentials user enabled: Run As isn't set under the app's OAuth Policies. - Integration User calls fail with
request not supported on this domain: the Token URL points atlogin.salesforce.com. Use your org's My Domain. - Integration User calls fail with
INVALID_FIELDfor a field that exists: the permission set grants the object but not that field. Add it under Field Permissions.
Next steps
- Tool customization — Control which Salesforce tools are exposed to users
- MCP gateway administration — Manage access and permissions